Vendor setup
In the vendor setup, you can create, edit, and delete vendor information for the companies that you do business with frequently. This information is essential to ensure proper and effective management of vendor relationships. The vendor information can be divided into the following categories:
-
Vendor details: Name, CVR number, address, contact details and other relevant basic information about the vendor. In addition, this page provides several settings and options to customize the handling of invoices from the specific vendor in 2CA.
-
Payment details: Bank details and currency.
-
Item accounting: A page to specify the accounting details for the company, in addition to the option of specifying accounting line details for invoice lines as well.
This structured approach makes it easier to manage vendor data and ensures that all necessary details is available for the efficient and error-free processing of invoices and other transactions.
Search field
A search field has been created where you can enter the following parameters to quickly find specific details:
-
Vendor number
-
Vendor Name
-
CVR number
In the search field there is a small X that allows you to easily clear the entered search text.

Table Overview of Vendors
When you access the vendor setup page, you will be presented with a table overview of all your created vendors. This data is retrieved from Business Central (BC) when you connect BC with 2Click Accounting. You also have the option to add a new vendor manually. If you post an invoice from a new vendor that is not in the list of your vendors, the system will ask if you want to create that vendor at the end of the posting process.
Each vendor is displayed with the following details:
-
Vendor number
-
Vendor Name
-
CVR/VAT number
In addition, there are "Edit" and "Delete" buttons to manage the vendor details.
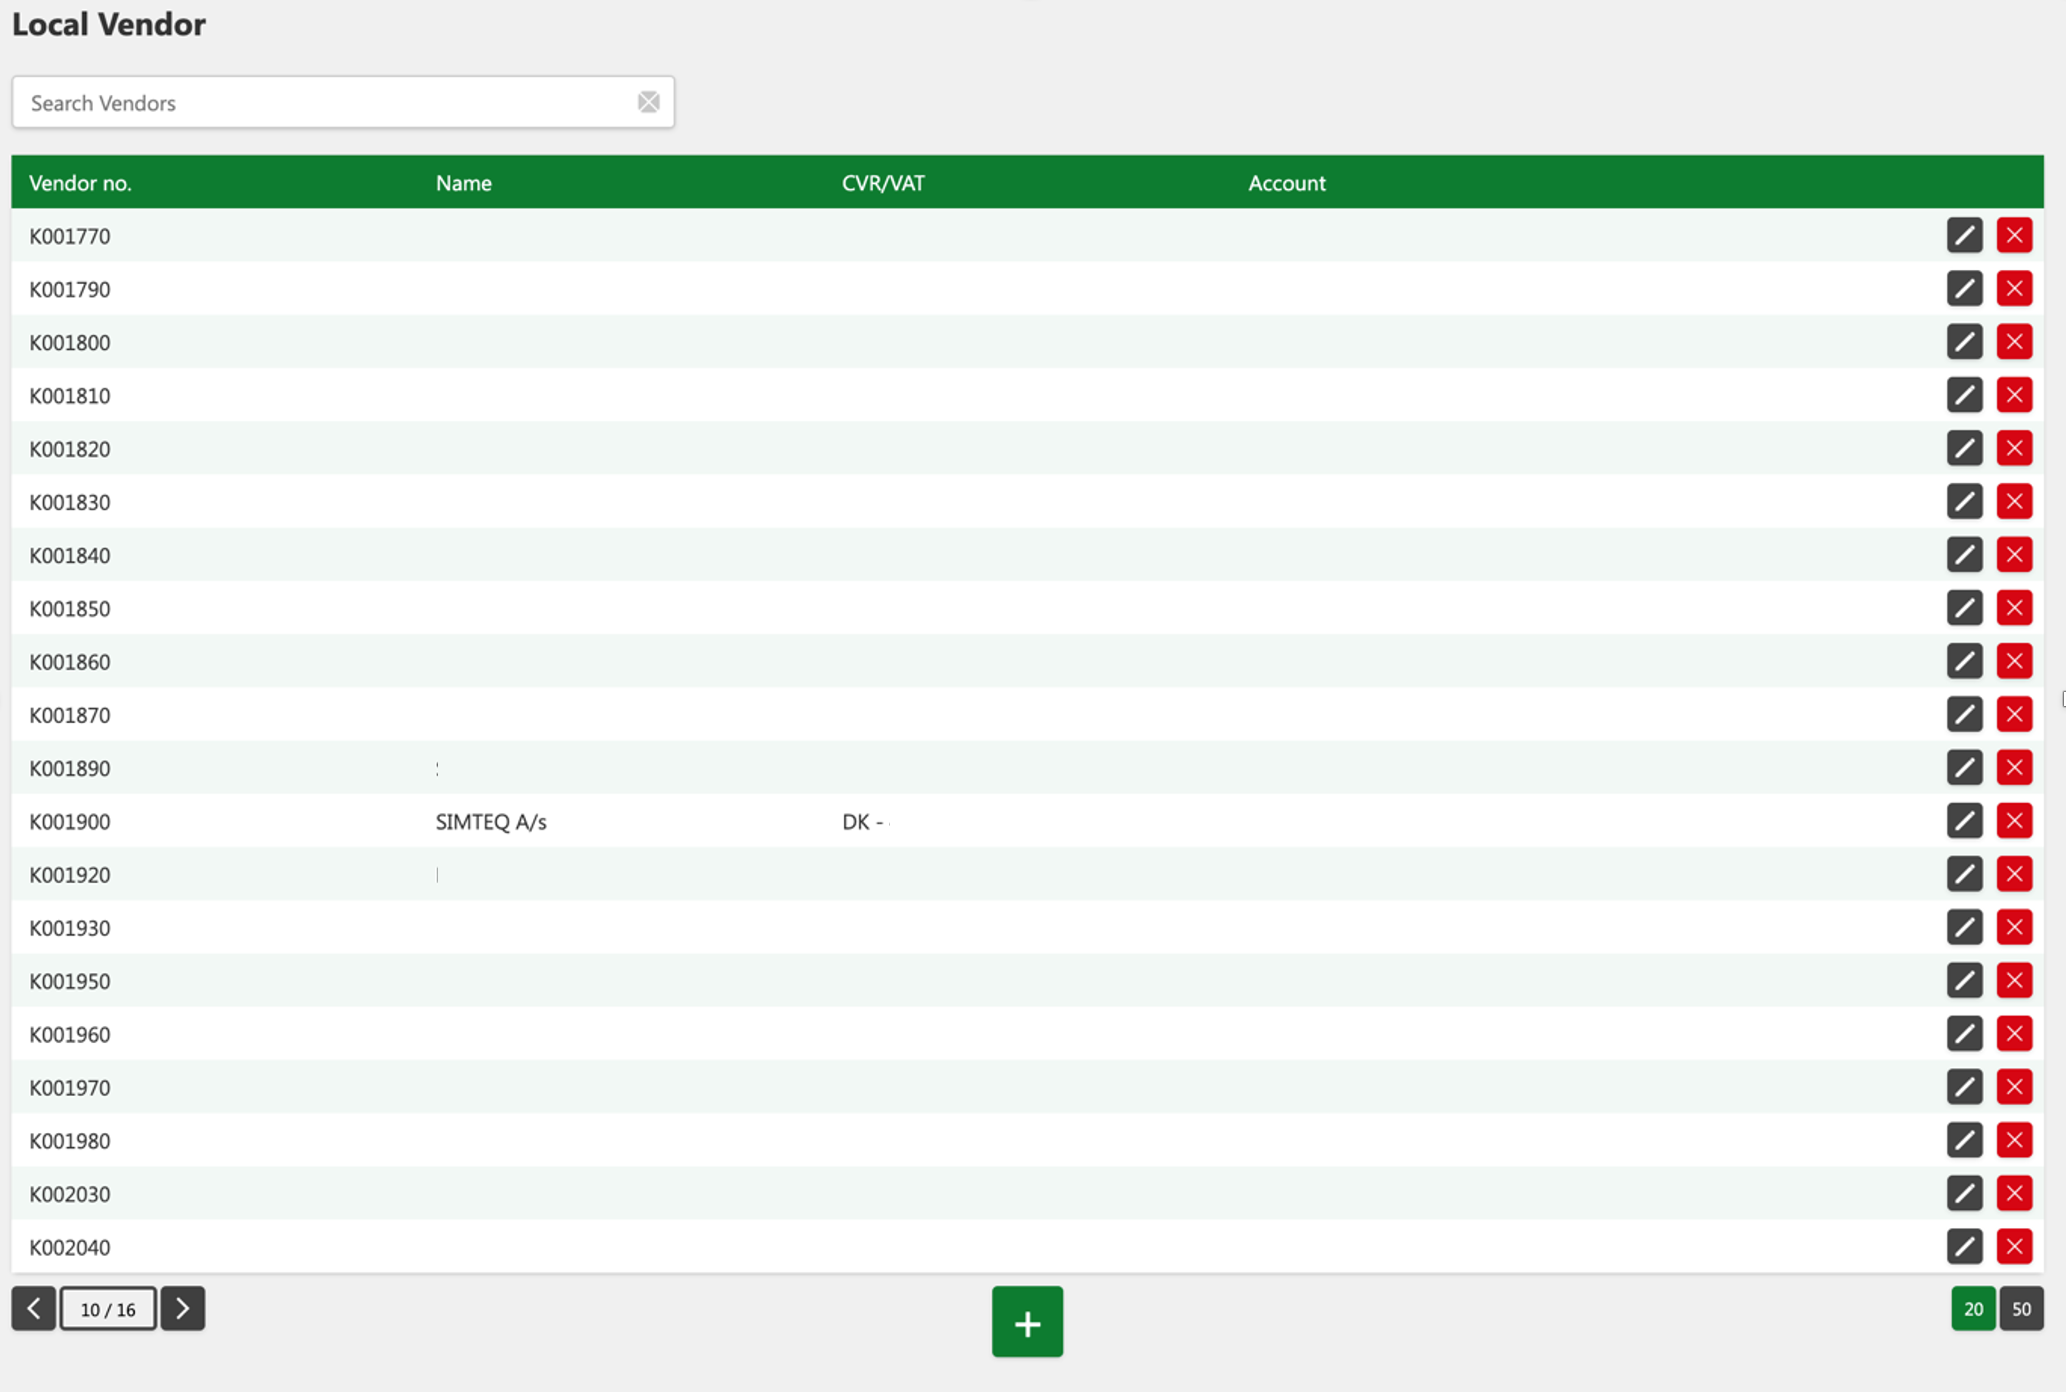
Please note that confidential information has been hidden from the image above.

Navigation buttons and Item display
Below the table are several buttons that allow you to customize the table according to your preferences:
-
The buttons on the left are used to navigate back and forth in the table.
-
The button in the middle allows you to create a new vendor (the "Add" button).
-
The buttons on the right allow you to select the number of items to display in the table. The selected view is marked with a green color.
Delete vendor
If the business relationship with a vendor ends, there are duplicates in the system, or the vendor is created with incorrect information, it may be necessary to remove the vendor from the list. Deleting a vendor from 2Click Accounting ensures that only relevant and correct data is stored, which contributes to a more efficient and accurate accounting process.
How to delete a vendor
-
Click Vendor setup.
-
Find the relevant vendor in the table.
-
Click the X (Delete) button to open a confirmation window.
-
Click Confirm to delete the vendor
If you wish to undo the action, click the X (Cancel) button.
Add a Vendor
In order for a vendor to appear in the table, it must be added to 2Click Accounting. This process simplifies accounting, as you can easily find and select the vendor from the list when you need to post invoices. This ensures a fast and efficient accounting process, where necessary vendor details is easily accessible.
How to add a vendor
-
Click Purchase invoices, and then click Vendor setup.
-
Click the + (Add) button.
-
Fill in the required (*) fields.
-
Click the Payment Details tab.
-
Click the + (Add) button and fill in the fields.
-
Click Save.
If you want to cancel the process, click on the Back button.

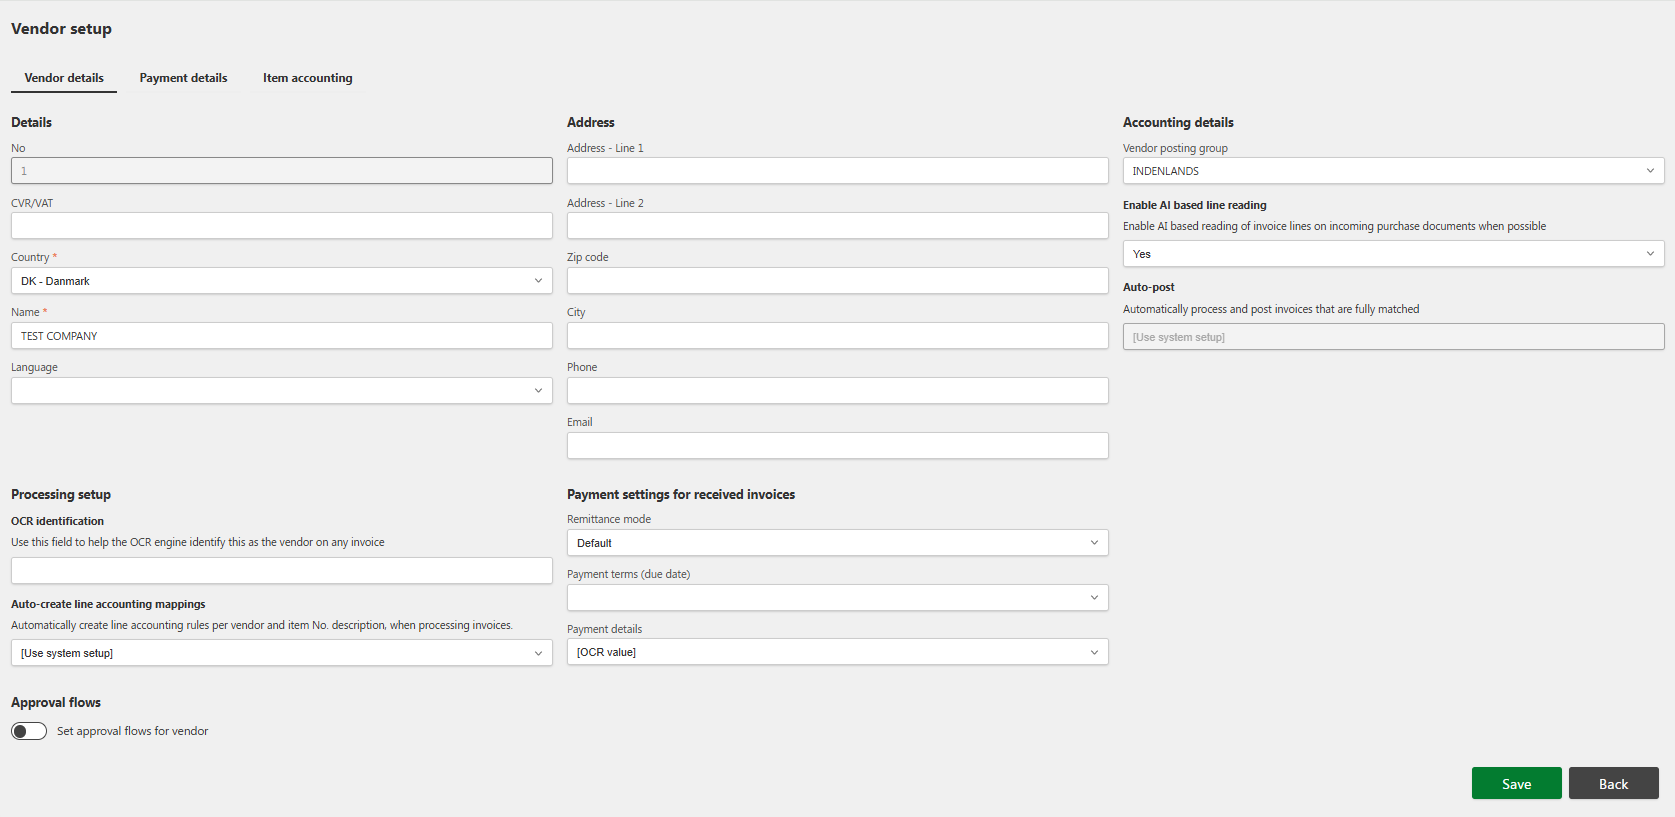
What can be defined in the vendor setup?
In the vendor setup, you can register standard vendor information such as name, address, and VAT number, while also configuring accounting details, payment terms, processing rules, and approval flows. This ensures that each vendor is setup the correct way suiting your business, and is handled correctly in both daily operations and financial reporting.
Vendor details (tab)
Details & Address
These are standard company details that may be required or is relevant to register and keep the company in the system.
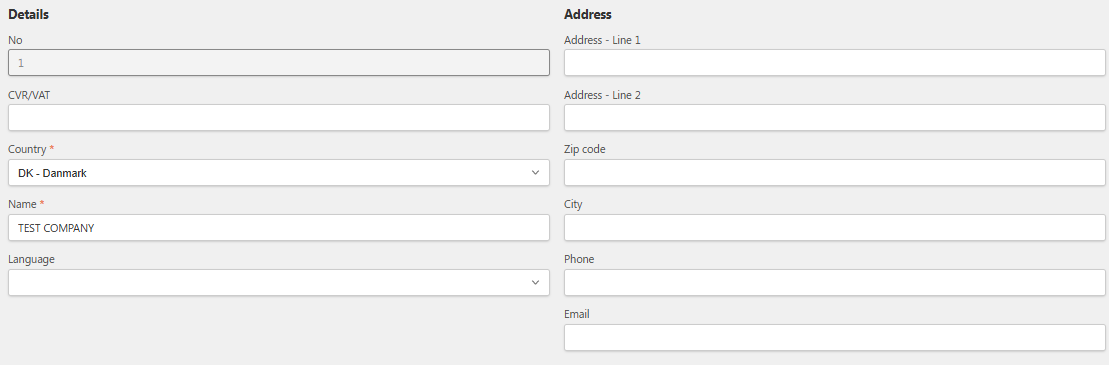
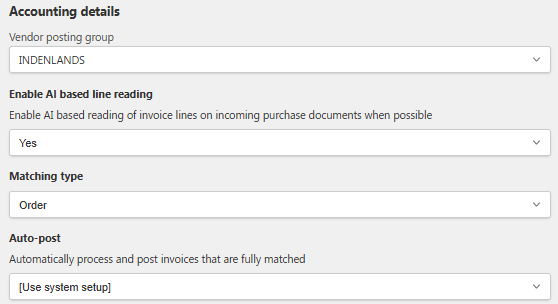
Accounting details
Here, you define how transactions with the vendor are posted in the system. In the old version, this section included many options related to the posting setup of the customer, which now have been moved to the "Item accounting"-tab, where you can specify selected rules and setups for single accounting lines on the selected vendor. The fields available to edit from
The fields typically include:
Vendor posting group: Determines which ledger accounts are used for payables and other vendor-related postings.
-
Enable AI based line reading: Controls whether AI-based line reading is applied to the vendor’s invoices.
Use system setup: Follows the company-set AI setting in Purchase settings that will apply for all vendors.
Yes: AI-based line reading is always used for this vendor.
No: AI-based line reading is never used for this vendor.
Matching type: Determines how invoices are matched in the system, with options such as no matching, order-based matching, or receipt-based (3-way) matching. Read more about matching type on this page.
-
Auto-post: Controls whether fully matched invoices from the vendor are automatically posted.
Use system setup: Follows the global Auto-post setting in Purchase settings that will apply for all vendors.
Yes: Fully matched invoices from this vendor are always posted automatically.
No: Invoices from this vendor are never posted automatically.
By configuring the accounting details settings, you ensure that transactions are posted consistently and in line with company accounting policies, while eliminating the need for manual postings and reducing the risk of errors later on.

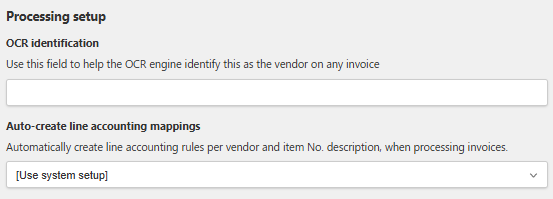
Processing setup
The Processing setup section allows you to define how the system handles vendor recognition and accounting line mappings during invoice processing. These settings ensure that invoices from the vendor are identified and posted correctly, while reducing the need for manual input.

OCR identification
This field helps the OCR engine recognize incoming invoices belonging to this vendor, even if standard identifiers such as VAT or registration numbers are missing. For example, if a vendor does not have a VAT number, you can enter an alternative value here (such as a keyword or unique identifier) that will allow the OCR engine to correctly associate future invoices with this vendor.

Auto-create line accounting mappings
This setting controls whether accounting line mappings created by the system’s AI are visible and stored directly in the Item accounting tab, or handled silently in the background.
When processing invoices, the system automatically learns from how accounting lines are filled out - for example, which accounts, posting setups, and VAT configurations are used for a specific item number or description. This learning process happens regardless of whether the function is enabled or not. The following options are available:
Use system setup: Follows the company-set setting in Purchase settings that will apply for all vendors.
(Yes) When enabled: Mappings are created and stored visibly under Item accounting for the selected vendor setup. This allows you to view, edit, or reuse them directly in the vendor setup.
(No) When disabled: The mappings are still created and used in the background, but they will not be displayed in Item accounting. In this case, you will still need to manually complete accounting lines for new invoices, but the system will “remember” your choices and apply them automatically the next time a similar invoice is processed.
In short, turning the setting on provides transparency and control - letting you see and manage the mappings - while turning it off keeps the process automatic and hidden. Either way, the system ensures that recurring invoice lines are recognized and posted correctly based on prior user input.

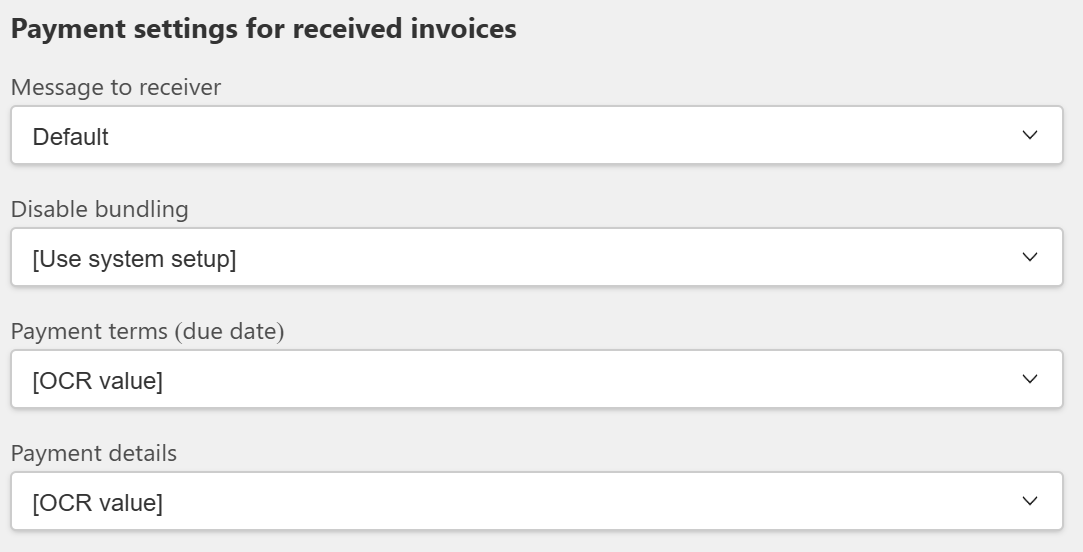
Payment setting for received invoices
This section defines how invoices from the selected vendor will be treated in terms of remittance, due dates, and payment details. These settings ensure that payments are created consistently and according to company policies, without requiring manual entry for every invoice.
- Message to Receiver
Determines what information is sent to the vendor when paying invoices. Options include:
Default: Uses the standard setting for your company (often the invoice number for the payment)
Order No.: Sends the purchase order number as reference on the payment.
Fixed: Uses a fixed remittance text (configured once and then reused for all payments to that vendor). Selecting "Fixed", triggers a new field to appear below where you specify the message to the receiver.
- Disable bundling
This field controls whether payments to the selected vendor can be bundled together with other payments. By default, the system bundles payments when the vendor, date, and currency match, but this behaviour can be turned off for individual vendors who require separate payments — for example, one payment per invoice.
The following options are available:
-
[Use system setup] – Follows the global Disable bundling setting configured under Bank → Settings. This is the default option.
-
Yes – Bundling is disabled for this vendor. Each payment will be processed individually, regardless of the global setting.
-
No – Bundling is enabled for this vendor, even if it has been disabled globally.
This vendor-specific setting always overrides the global setting under Bank Settings, allowing targeted control for individual suppliers.
- Payment terms (due date)
Defines how the due date of the invoice is calculated. The values shown in this field (including any cash discount terms), are retrieved from your ERP setup and specified here in the vendor setup. These terms determine both the invoice’s due date and any applicable discount date, which will later be used automatically in Bankwhen preparing payments.
Common examples of payment terms include:
OCR value: Reads the due date directly from the invoice (OCR line).
14 days net: Payment due 14 days after the invoice date.
21 days net: Payment due 21 days after the invoice date.
8 days net: Payment due 8 days after the invoice date.
Net cash: Payment due immediately.
Current month: Payment due within the current month.
If discount terms exist (e.g., “2% 10 days, net 30 days”), they will also appear here. This means the vendor offers a 2% discount if the payment is made within 10 days; otherwise, the full amount is due within 30 days. These terms are automatically applied and evaluated in Create payments, where 2Click Accounting calculates whether the payment qualifies for a discount and applies it accordingly.
- Payment details
Defines which payment details are used when processing the invoice. Options include:
OCR value: Uses payment details directly from the invoice (OCR line).
Use payment details from vendor setup: Always applies the information from the "Payment details" for the selected vendor).
Set to paid: Marks the invoice as paid, ensuring posting without creating a payment transaction.
Approval flows
The option to set approval flows for vendor allows you to link one or more approval flows directly to a specific vendor. When enabled, all invoices received from this vendor will follow the assigned approval flow before they can be posted or paid. Activating the function will allow you to select from the company's created approval flows from the approval setup, which you then can designate to the selected vendor setup.
This ensures that vendor-specific rules are followed, making it possible to apply different approval structures depending on the vendor’s importance, transaction size, or internal policies.

Payment details
In this section, you define the vendor’s general bank account information to ensure that payments are processed correctly when receiving invoices from the selected vendor.
Fields include:
Currency: Select the currency linked to the account.
Branch No.: Used for local bank identification.
Account No.: The vendor’s bank account number.
IBAN: International Bank Account Number, used for cross-border payments.
SWIFT: The bank’s SWIFT/BIC code, identifying the bank internationally.
By entering the vendor’s payment details here, the system ensures that invoices are paid to the correct account without manual input each time a payment is created. This reduces errors and ensures compliance with both domestic and international banking standards.
Also note that each vendor can have multiple payment detail setups registered in different currencies. This allows payments to be processed correctly according to the currency of the invoice - for example, ensuring that EUR invoices are paid to the vendor’s Euro account and GPB invoices from their British pound account.

Item accounting
The Item accounting tab allows you to define detailed posting rules for specific invoice lines from the selected vendor. This ensures that recurring items or descriptions on invoices are automatically posted to the correct accounts without manual input each time.
Each line in the table represents an accounting rule based on one or more identifiers from the invoice - such as an OCR route, Item No. or Description. When the system detects a match between these values and an incoming invoice line, the predefined posting setup will automatically be applied.

Field overview
OCR route: If the vendor uses OCR routing, this field can link a specific OCR identifier or keyword to an accounting rule. This helps the system recognize which account setup to use based on OCR data - for instance, for vendors without a VAT number or when invoices are read via OCR recognition.
Item No.: The item number used on the vendor’s invoice line. If the same number appears again, the system will automatically post it according to this setup.
Description: The text description on the invoice line that triggers the accounting rule.
Exact match: Defines whether the description or item number must match exactly (“Yes”) or partially (“No”) for the rule to apply.
Type: The posting type (G/L Account or Item), determining how the amount will be accounted for in Business Central.
Account: The general ledger account number the line should be posted to.
General posting setup: Defines how transactions are handled in combination with item or customer posting groups (for example service, goods, etc.)
VAT posting setup: Determines the VAT calculation and reporting rules that apply to the specific item and it's transactions.
Job number / Job task number: Used to connect the line to a specific project or job. (These fields are only available if “Enable project fields” is turned on in General invoice settings.)
Deferral schedule: Decides if the invoice line should be posted with deferred revenue or expense recognition. Used to allocate invoice amounts over a defined period instead of recognizing the full amount immediately (e.g., subscriptions, service agreements, or prepaid vendor costs). (T*his option is only available if “Enable deferral scheduling” is turned on in General invoice settings.)*
Dimensions (three-dot icon): Opens the list of dimensions imported from Business Central (up to five).
How it works
When an invoice from the vendor is processed, the system compares the invoice line’s Item No., Description, and OCR route against the entries listed here.
If a match is found, the corresponding account, posting setup, VAT setup, and other parameters are automatically applied to that invoice line.
If no match is found, the system will require manual input for that line - unless AI-based learning has already stored similar mappings in the background (see Auto-create line accounting mappings in the Processing setup section earlier on this page).
Standard rules and OCR-route
In Item accounting, it is smart to define a standard rule without any specific match parameters (as the empty one above). This serves as a fallback setup that will be applied to all invoice lines when no other more specific match is found.
You can also specify OCR-routes manually for an invoice (the value the OCR should look for in received invoices), by cropping, mapping, or setting a fixed value in the OCR-template. This will then try to match one specific line in the line accounting setup you've created. It is also possible and smart to have the OCR-template value in received invoices set to empty when looking to use multiple line accounting setups either through the setup or through AI based line reading.
This setup ensures that recurring vendor invoices are processed consistently and automatically, while still allowing flexibility to manually define or override rules where needed.
Editing a vendor setup
You have the option to update the vendor and payment details in addition to the item accounting setups.
Updating a vendor setup may be necessary to ensure an efficient and error-free accounting process. This can include changes to the vendor's basic data, accounting details, approval flows, or dimension setup. All these adjustments can easily be made in the vendor setup, so the system is always up to date with the latest details. The main target of the vendor setup is as everything else in 2Click Accounting: to create the accounting process simpler for you.
*Note that some settings or fields may be triggered by the general invoice tab settings, and will need to be changed before allowing you to edit them in the vendor setup. *

How to add/edit vendor details
-
Click Purchase invoice, and then click Vendor setup.
-
Press the "+"-button to create new, or find the desired vendor in the vendor setup list you want to edit.
-
Edit the fields you want.
-
Click Save.
To undo the changes, click Back.

How to create/edit payment details
-
Click Purchase invoice, and then click Vendor setup.
-
Find the desired vendor in the vendor setup list.
-
Click Payment Details header.
-
Edit the fields you want or click + if you want to add new payment details.
-
Click Save.
To undo the changes, click Back.

How to create/edit item accounting
-
Click Purchase invoice, and then click Vendor setup.
-
Find the desired vendor in the vendor setup list.
-
Click Item accounting header.
-
Press the edit button and Edit the fields you want, or click + if you want to add new payment details.
-
Press Save.
To undo the changes, click Back.

Button Overview

Edit button: Used to edit existing vendor details.

Delete button: Used to remove a vendor from the system.

+ (Add) button: Used to add a new vendor or update payment details for an existing vendor.

Navigation buttons: Used to navigate between pages in the table.

Display control: Ability to select the number of items to display at once in the table.

Save & Back buttons: Used during create or edit mode to save changes or cancel actions.

Confirm & Cancel buttons: Used in pop-up windows to confirm or cancel an action.