User setup

User setup and configuration of expense management
User setup is the configuration used to manage the posting of expenses and receipts. Certain information, such as email address and name, is automatically retrieved from the user's profile. A specific e-mail address is also created for handling expenses. This e-mail address can be used by the user to send disbursements or receipts, which are then automatically registered in the system.
In the same way as with purchase invoices, which have a specific (OCR)-email that receives them, this email for expenses also works in a similar way, however it is only accessible for the selected user, meaning that every expense user has it's own peculiar (OCR)-email. To this email address, the user can send expenses through mail (e.g. forwarding digital receipts) which then will be OCR-read, where the receipts data automatically will be sorted out of the email, and created as an expense/receipt for the user.
Note that e-mail and name can only be edited under "Users" in "Settings".
Optional fields
There are fields that are optional to fill in, such as:
-
Address
-
Address 2
-
Postal code
-
City
-
Phone
-
Bank branch number & Bank account number (Only if Denmark is set as "Country")
-
IBAN & SWIFT (If a different country than Denmark is set)
-
Secretary functionSecretary function
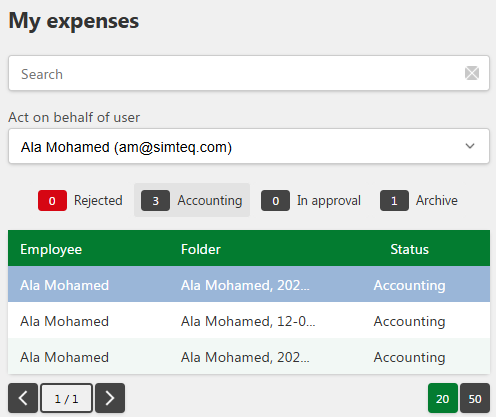
The secretary function allows another employee to be assigned rights to create and post expenses and receipts on behalf of a user. In the following example, Ala Mohamed has selected SIMTEQ ADM as his secretary, which authorizes SIMTEQ ADM to act on behalf of Ala Mohamed. In order for SIMTEQ ADM to do so, SIMTEQ ADM must select Ala Mohamed from the drop down list below where it says "Act on behalf of user".
Required fields
The field stated below are required to be filled in:
-
Name (Automatically retrieved from User setup in Settings)
-
Country (This affects whether IBAN & SWIFT is shown, or only Bank branch number & Bank account number will show)
-
Currency
-
Expense app opening screen
Note: When Denmark is selected as the country, the fields Bank branch number & Bank account number are displayed. For all other countries, IBAN and SWIFT numbers are shown instead.
Expense app opening screen
The Expense app opening screen setting allows the user to select the desired function that will appear when opening the application. This feature depends on whether corporate card transactions are enabled or disabled. You will be presented with the following options:
-
Default
-
Card transactionsDefault
When you open the application, a button labeled Upload Receipt will appear. Clicking this button gives you three options:
-
Choose picture
-
Take picture
-
Choose file
Card transaction
This feature displays a list of your card transactions where you can match existing receipts or upload a new receipt for the transaction.
How to complete a user setup
-
Click on User setup under Expenses.
-
Fill in all the required fields.
-
Click Save to save the changes.
If you regret changes made, you can either navigate away from the page or refresh it.