Settings
The Settings page is specifically designed for the purchase invoice module and is only available to the admin user. The settings act as a control panel where features related to the purchase invoice module can be enabled or disabled.
All settings are clearly marked with their respective headers and associated toggle switches, which allow you to enable or disable the features. When a setting is enabled, the toggle switch will appear in green, while it will be black when disabled. This visual design structure ensures an intuitive and easy-to-understand user interface, where the user can easily identify which settings are enabled or disabled.
General invoice settings
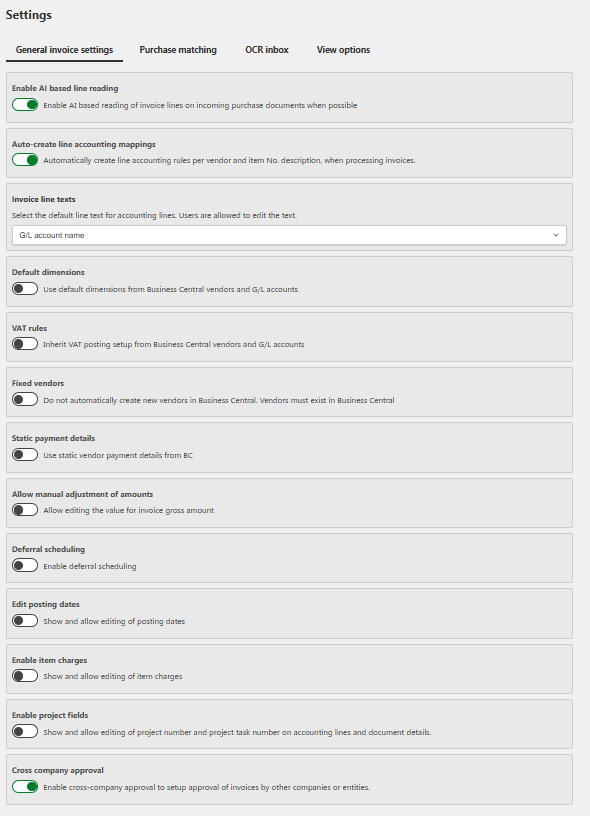
Enable AI
The Enable AI setting activates AI-based line reading for received invoices. When enabled, the system uses artificial intelligence to automatically interpret invoice lines, such as vendor name, order number, amounts, and other key details. This reduces the amount of manual data entry required and ensures a faster and more accurate invoice handling process. AI can also be adjusted on a vendor level in Vendor setup, allowing you to define whether AI should be enabled or disabled for specific vendors regardless of the general setting.

Auto-create line accounting mappings
The Auto-create line accounting mappings setting controls whether 2Click Accounting automatically creates accounting line rules when processing invoices.
When enabled, the system will analyse each processed invoice and automatically generate accounting mappings based on the vendor and the item number or description found on the invoice lines. These mappings are then saved under the corresponding vendor’s Item accounting tab in the Vendor setup, where they can later be reviewed, edited, or deleted.
This function ensures that frequently recurring invoice lines — such as standard subscriptions, fees, or services - are recognized and posted automatically to the correct accounts in the future.
When disabled, the system will still remember your previous accounting actions in the background but will not display or save them as visible mappings under the vendor setup. This means that users must continue to complete invoice lines manually.
Recommendation:
It is generally recommended to keep this setting enabled to reduce manual work and ensure consistent and accurate postings over time, especially for vendors with recurring or similar invoice patterns.
Invoice line texts
The Invoice Line text feature serves as a key tool to ensure that users provide a description for each invoice line before the invoice can be posted in 2Click Accounting. This supports consistent and detailed documentation, promoting accuracy and transparency in the accounting process.
What happens when the feature is enabled?
Once enabled, the Description field under the Received Invoices section - specifically in the accounting line details, will automatically be populated with a predefined value if the field is left empty. This default value acts as a fallback unless the user chooses to enter a custom description.
Available default options for the description field:
G/L account name: Uses the name of the selected general ledger account as the line text.
Vendor name: Uses the vendor’s name as the line text.
Vendor name and invoice No.: Combines the vendor’s name with the invoice number.
Vendor name and order No.: Combines the vendor’s name with the purchase order number.
User input mandatory: Requires the user to manually enter a text for each line before posting.
This feature helps streamline workflows and maintain consistent documentation across the organization.
Default dimensions
In 2Click Accounting, default dimensions can be configured to use either custom dimensions or predefined dimensions that are retrieved from Business Central and G/L accounts.

What happens when you enable default dimensions?
When default dimensions is enabled, the dimension set will not be available for editing while adding or editing a vendor in the "Vendor setup" section. Despite this, you will still be able to specify dimensions for an invoice before it is posted in 2Click Accounting.
Depending on the dimension settings that are configured in Business Central, custom dimensions can occur. These dimensions can appear before an invoice is posted and can be based on a combination of the vendor and the G/L account.
VAT rules
In 2Click Accounting, VAT rules can be configured to apply either custom VAT rules or predefined VAT rules retrieved from your integrated ERP system and G/L accounts.

What happens when you enable VAT rules?
When VAT rules are enabled, the posting setup and VAT posting setup fields will not be editable while adding or editing a vendor in the "Vendor setup" section. Likewise, it will not be possible to enter values in these fields for an invoice before it is posted in 2Click Accounting.
Fixed vendors
The "Fixed Vendors" feature can be enabled to prevent the creation of new vendors in Business Central after posting an invoice in 2Click Accounting.
The advantage of activating "Fixed vendors" is that it ensures consistency and control in the vendor overview. By preventing the creation of new vendors after invoice posting, you avoid unintended or unnecessary changes to the vendor database. This helps to maintain order and accuracy in the company's accounting processes, reducing the risk of errors and simplifying the management of vendor details.
Static payment details
Static payment details allows you to use the payment details from the vendor setup in Business Central, while still having a restriction against overwriting this information. This requires the setting to be enabled.
The advantage of using static payment details is to ensure consistency and reliability in the payment process. By limiting the ability to change payment details, errors or unintended changes are avoided, ensuring that payments are completed correctly and in accordance with the payment details set up for the vendor. This contributes to a more efficient and reliable economic operation.

Manual adjustment of gross amounts
Admins can allow business users to manually adjust the gross amount by either changing the amount or locking the field for further changes.
Examples of situations where manual adjustments to the gross amount may be relevant before invoice posting:
-
Agreement terms: If there are special contractual terms with the vendor that require changes to the invoiced amount, such as discounts, price adjustments, or bonuses.
-
Error correction: If errors are detected in the invoice amount, such as incorrect prices, quantities, or added fees.
-
Partial payments: For partial payments where only part of the invoice amount must be posted, you may need to adjust the gross amount to reflect the portion that must be posted.

What happens when you enable manual adjustment of gross amount?
When this setting is enabled, business users are given the option to adjust the gross amount (amount) before posting an invoice. This feature increases flexibility by allowing users to correct any errors in the invoice amount before posting. This ensures accurate accounting and provides better control over invoice processing, which promotes the accuracy and efficiency of the company's accounting processes.

The field in "Received invoices" under invoice details will typically look like an editable field.

Project field (Project management)
Project fields, also known as project management, enable business users to post invoices for different projects. This helps to:
-
Keep track of costs and revenues on all projects
-
Report and make follow-ups (incl. finances)

What happens when you enable project fields?
When project fields are enabled, they become available at both the header level and the line level. Under the "Received invoices" section, a field titled "Project" will be added where the user can enter a "Project" and a "Project Task No." in the invoice details. In addition, in the accounting line details, there will be the same fields: "Project" and "Project Task No.", which the user can fill in.
-
At the header level (invoice details) in "Received invoices", the fields will be displayed.
-
At the line level (accounting line details) in "Received invoices", the fields will also be available
When "Project" and "Project Task No." are entered at the header level, these values will automatically be applied across all lines in the invoice. However, if the information is entered at the line level, it applies only to the specific line and not to the entire invoice.
Edit posting dates
Posting dates can be configured to be either visible or hidden. When the field is visible, it is possible to edit the posting date. If, on the other hand, the field is hidden, the posting date cannot be changed.

What happens when you enable edit posting dates?
When this setting is enabled, users in 2Click Accounting will be able to access and edit the "Posting date" field under invoice details in the "Received invoices" section. This allows users to specify an exact date for when the invoice should be posted.

Thus shown under invoice details (main level) in "Received invoices".
Deferral Scheduling
A deferral schedule is used to spread an expense or income over multiple periods instead of recognizing the full amount at once. It ensures proper accounting in line with the accrual principle.
What is it used for?
Deferring costs like rent, licenses, or insurance.
Automatically allocating amounts over the correct periods.
When is it relevant?
For large amounts covering several months.
To avoid major fluctuations in financial statements.
To comply with accounting standards.
Example: An invoice of DKK 120,000 for a yearly license is deferred with DKK 10,000 recognized each month using a deferral schedule.
Enable item charges
Item charges can be configured to be either visible or hidden. When the field is visible, it enables the editing and distribution of item charges. If the field is hidden, it will not be possible to change or distribute item charges.
What happens when you enable item charges
When item charge editing is enabled, an additional option is added under account type, called "Item charge," in the "Received invoices"-section under accounting line details. However, it is necessary that the "Line matching" option also is activated in order to be able to change the matching type.
In order to take advantage of the allocation of item charge during the posting of an invoice, the following conditions must be met:
-
Click Purchase Invoices, and then click Received invoices.
-
Under Accounting line details, select the account type as item charge.
-
Select the item charge type.
-
Click on the blue button for distribution.
-
Choose to distribute the item charge on one receipt.

Cross company approval
The "Cross company approval" setting enables approval of invoices across multiple companies or entities within the same organization. When activated, invoices received in one company can be sent for approval to users in another company, allowing centralized and streamlined approval processes across all entities.
Enabling this setting also makes the "Cross company approval" tab available in the menu. However, this tab will only be visible if the user has been granted access to it under "Navigation" in the "User setup" page by the admin. This ensures that only authorized users can configure and manage cross-company approval relationships.
This functionality is especially useful for organizations with multiple related companies - for example, a hospitality group managing several hotels or entities under the same ownership - where invoice approvals are handled centrally.
Purchase matching
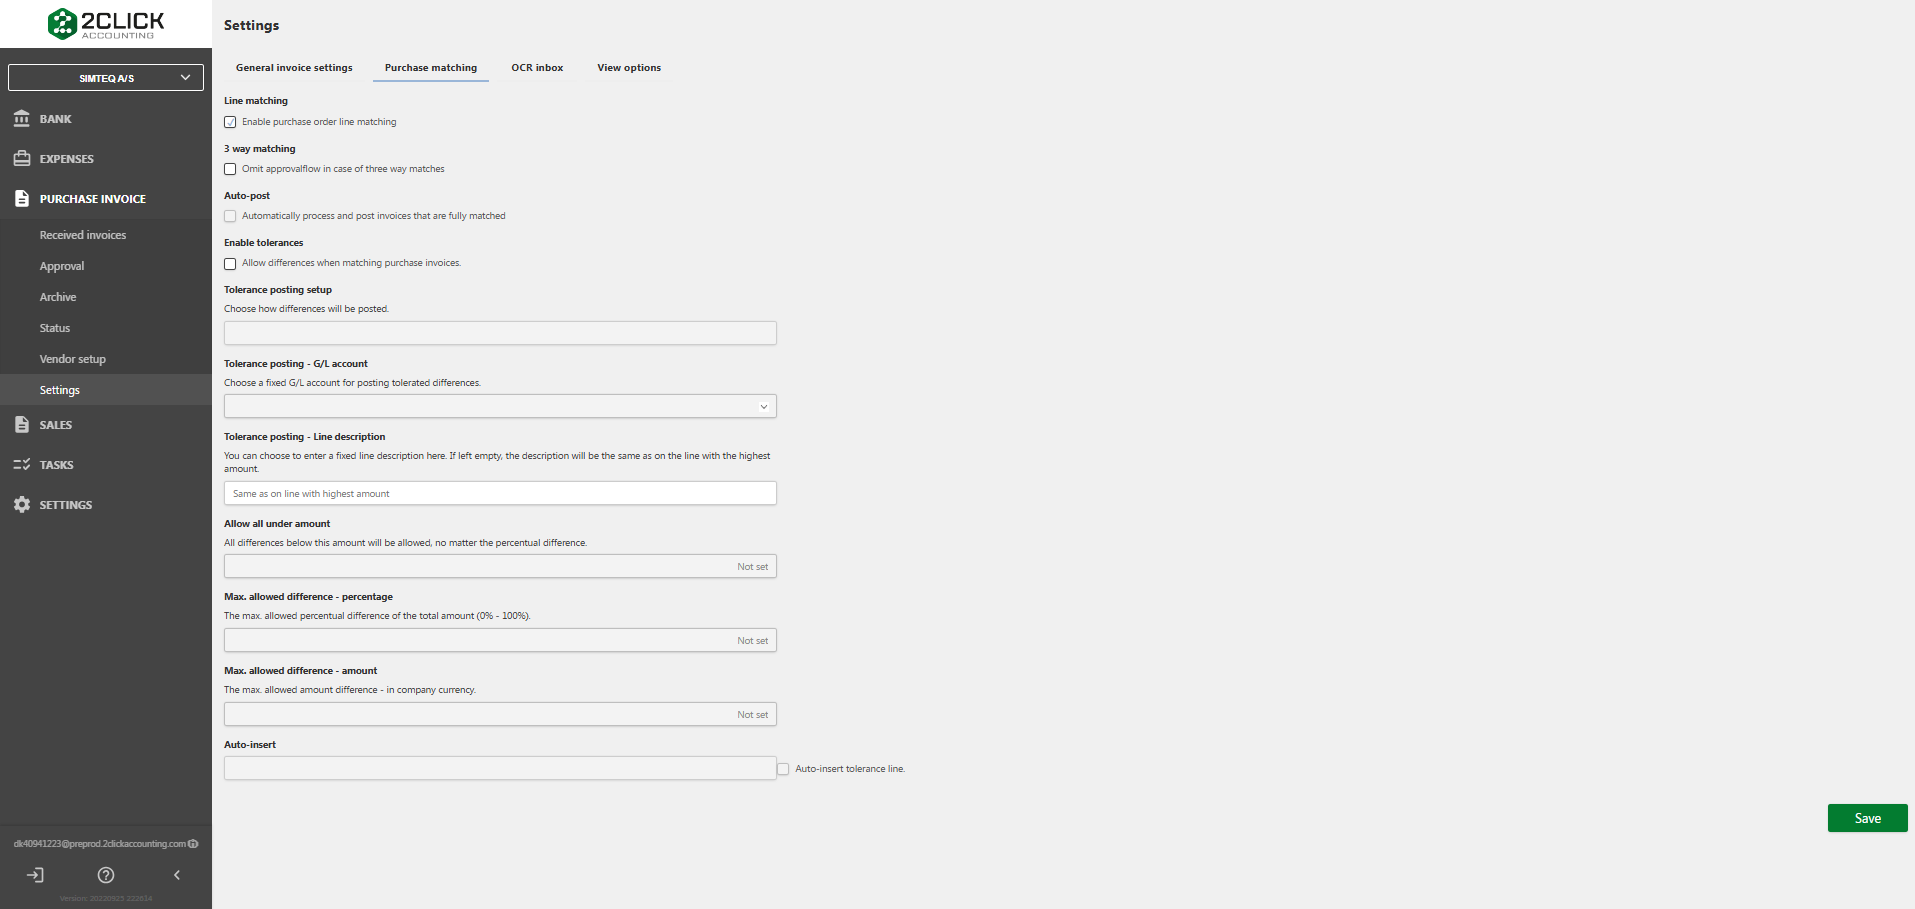

Line matching, 3-way matching & auto-post of 3-way matchingPurchase order line matching and 3-way matching are two features that are closely related, but can also be enabled and used independently. Purchase order line matching is enabled when 3-way matching is turned on, but it's also possible to enable purchase order line matching while 3-way matching remains disabled. Auto-post does only work together with 3-way matching being activated, meaning that all three functions will have to be activated for auto-post to be used.
3-way matching requires that there is a purchase order, a receipt, and an invoice that must all match before the functionality takes effect. When 3-way matching is enabled, the system ensures that the received invoice can only be approved if it matches the associated purchase order and receipt. This means that 3-way matching can only be used when "Receipt" is selected for Matching type and not when "Order" is selected.
Auto-post's sole purpose is to reduce the time you spend on approving invoices that definitely match anyways.
Use of AI in line matching
As part of the matching process, AI is applied automatically. For invoices in "Received" with the matching type set to either "Order" or "Receipt", the system uses the purchase order number on the invoice to search in the ERP-system and identify corresponding lines. This ensures that the matching is carried out efficiently and with a higher degree of accuracy.

What happens when you enable purchase order line matching?
When purchase order line matching is enabled, the system starts a process where it compares the specific lines on a purchase order with the corresponding lines on the invoice. This feature ensures that the invoice is consistent with the original purchase order, which is important for proper posting and invoice management.
Visual: When purchase order line matching is enabled, a new field called "Matching type" will be added below the invoice details when processing an invoice in the "Received invoices", "Approve invoices", "Invoice archive", or "Invoice status" sections. This field allows you to specify the type of matching you want, which is a key parameter in the invoice processing process.
During the editing (before posting) of an invoice, the following options will be available in the "Matching type" field:
-
No
-
Reception
-
Order
When either "Receipt" or "Order" is selected in the "Matching type" field, the screen under "Accounting line details" in "Received invoices" will be updated. A table will be displayed that contains all relevant order and item receipt records in the system. If "Order" is selected, it means that a purchase order has been created, but no item receipt has been performed. If "Receipt" is selected, it indicates that both a purchase order and an item receipt have been registered.

What happens when you enable purchase order line matching and 3-way matching?
When both purchase order line matching and 3-way matching are enabled, the following processes are triggered:
-
Purchase order line matching: The system compares purchase orders to invoices to match the specific lines on the purchase order with the corresponding lines on the invoice. This helps to ensure that the invoices are posted correctly in accordance with the original purchase orders.
-
3-way matching: This process compares purchase orders, receipts, and invoices to ensure that the items or services received match the items ordered and the invoice amount. It is a control mechanism that ensures that the invoiced amounts are correct and in line with the original agreements.
Overall, enabling both purchase order line matching and 3-way matching improves the handling of purchase orders, receipts, and invoices, creating a more accurate and efficient process and increasing accounting accuracy and control.

What happens when you enable purchase order line matching, 3-way matching and auto-post?
When auto-post is enabled, purchase invoices that are fully matched through 3-way matching, and ONLY these, will automatically be posted. This means that once the purchase order, receipt, and invoice all correspond, the system will post the invoice directly in "Purchase". The posted entry becomes available for payment processing in "Bank" and can also be viewed later in the "Archive" within the "Purchase" module.
Enable tolerance
The tolerance feature allows you to post invoices and purchase orders even when there is a difference between the two amounts. This feature is useful in situations where minor variances between the invoiced price and the original purchase order are acceptable and don't require manual adjustment. It requires purchase line matching to be enabled before this feature can be used.

Posting of differences - G/L account and Line description
By activating the tolerance function, you can define how these differences should be handled, including specifying which general ledger accounts should be used to post the difference, and how the line description for the added difference line should be displayed. This ensures that the system handles any deviations in a consistent and correct manner, while also allowing the user to control and specify how the deviations should be recorded in the financial statements.
In addition, the following parameters can be set to define the tolerance level:
-
Allow all under amount: Sets a limit on what differences are acceptable without further approval. For example, differences below a certain amount can be automatically accepted without being reported as a deviation.
-
Maximum allowed difference - Percentage: Determines the maximum percentage difference between the purchase order and the invoice that the system allows before requiring manual intervention.
-
Maximum allowed difference - Amount: Specifies the maximum difference in absolute numbers that the system allows between invoice and purchase order without requiring manual approval.
Auto-insert
The Auto-insert feature allows the system to automatically add a tolerance line when there is a small difference between the purchase order and the invoice, provided that the difference falls within the tolerance limits you have defined.
When this feature is enabled, and the difference between the purchase order and the invoice is below the maximum allowed tolerance (either defined as a percentage or as an amount), the system will automatically create a posting line for the difference. This eliminates the need for manual corrections and ensures that invoices can still be processed smoothly even if minor deviations occur.
The automatically created line will follow the setup defined under tolerance management. You can choose whether the line should:
Be posted with the same account and description as the line with the highest amount, or
Be posted with the same description but using a fixed G/L account defined in your tolerance setup.
This ensures that differences are always handled consistently and in line with company policies, while reducing manual effort and the risk of errors.
OCR inbox
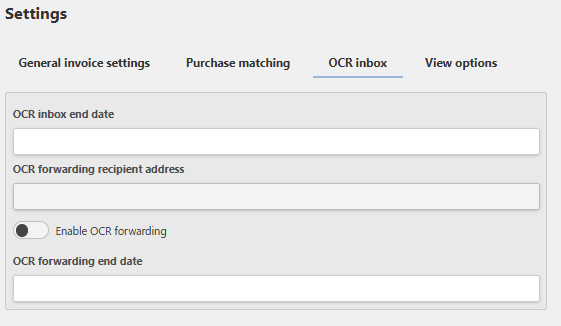
The OCR Inbox in 2Click Accounting allows users to control how OCR documents are handled and forwarded, improving efficiency in processing incoming invoices. This feature can be customized to suit the specific needs and workflows of the business.
Functionality and options:
-
OCR inbox end date: Users can define an OCR Inbox end date. When this date is set, the system opens the option to specify an OCR forwarding recipient. This allows you to select an email address to receive the submitted OCR documents, instead of sending the documents to the original OCR email address.
-
OCR forwarding recipient address: The OCR forwarding recipient address can be enabled so that you can receive the OCR documents at the same time, allowing you to have a backup or extra control over incoming invoices. When enabled, the OCR documents are sent to the selected email recipient.
-
OCR forwarding end date: An end date can also be entered for the forwarding of OCR documents, which means that the functionality will automatically end after the specified date. Once this date is reached, the system will revert to the default setting where the OCR documents are sent to the original OCR email address.
View options
The "View options" page allows you to customize how the invoice overview tables are displayed in 2Click Accounting. These settings affect both the order of invoices and which columns are visible in the overview tables.
- Invoice table order
Choose the default sorting of invoices in the overview tables. Choose between sorting it from newest to oldest or oldest to newest based on your preferences. Select one of the options in the drop-down and press save to change your tables.
Column on pages for received invoices and approval
Select up to three columns that will be shown in the tables for "Received invoices" and "Approval". Options include vendor name, invoice number, combined vendor name & invoice number, amount, due date, and received date. Select up to three of your desired column filters and press save to customize your tables.
Invoice approval status overview
Select up to three columns that will appear in the approval status overview, also called the "Status"-page. In addition to the same options as above, you can also include "Approval users" to quickly see which users are involved in the approval process. Select up to three of your desired column filters and press save to customize your tables.
By adjusting these view options, you can tailor the system to highlight the most relevant information for your daily workflows.
Button overview

The button indicates that the function is Disabled.

The button indicates that the function is Enabled.