My receipts
My receipts is the page where you get access to your loaded receipts which, among other things, have been submitted via the app (2Click Accounting Expense), submitted via email, or if you are on the web application and want to upload a receipt to be posted.
General structure
The page-view is divided into the following two main sections:
-
List of all receipts
-
Receipt details, and viewing receipts.
List of all receipts

The posting process of expenses (without reconciling the expense):
The posting process for an expense typically involves three steps: employee submission, accountant review, and approval through a set approval flow. In certain cases, the accountant can also act as an approver.
If the accountant must both review and approve the expense, the process can either follow the standardized procedure described below or be adjusted. The adjustment can be made by deactivating the accounting function in the settings, so that the process is exclusively handled through the approval flow.
In 2CA, you can post your expense by doing the following:
Upload a receipt
Upload a picture of the receipt to the system.
OCR accepts these formats: 'jpg', 'jpeg', 'png', 'tif', 'tiff', 'bmp', 'heic', 'heif', 'raw', 'pdf'
Filling in the receipt details
Click the Edit button, fill in the relevant fields, and then click Save. Then click on the green Submit button.
Approval from an accontant
The accountant must now accept the expense. This is done by navigating to the "Accounting"-tab and clicking Approve.
Approval through the approval flow
The expense must then be approved through the approval flow. This is done by navigating to the "Approval"-tab and following the process there.
Posting and achiving
After approval, the expense will automatically be posted in the system within a short time. To confirm the posting, navigate to the "Archive"-tab. If the expense appears there, it has been correctly posted.

What is the accountant's role and how does the accountant perform the process?
By activating the accountant function, the user gets access to the "Accounting"-tab. This page is structured in the same way as the employee's overview of own expenses, but with extended rights for the accountant.
The accountant has the option to change or delete receipts before they are forwarded for approval. This function may be relevant in companies where it is part of the internal policy to ensure correct registration and adjustment of expenses before they are included in the approval process.
Rejecting expense or individual receipts
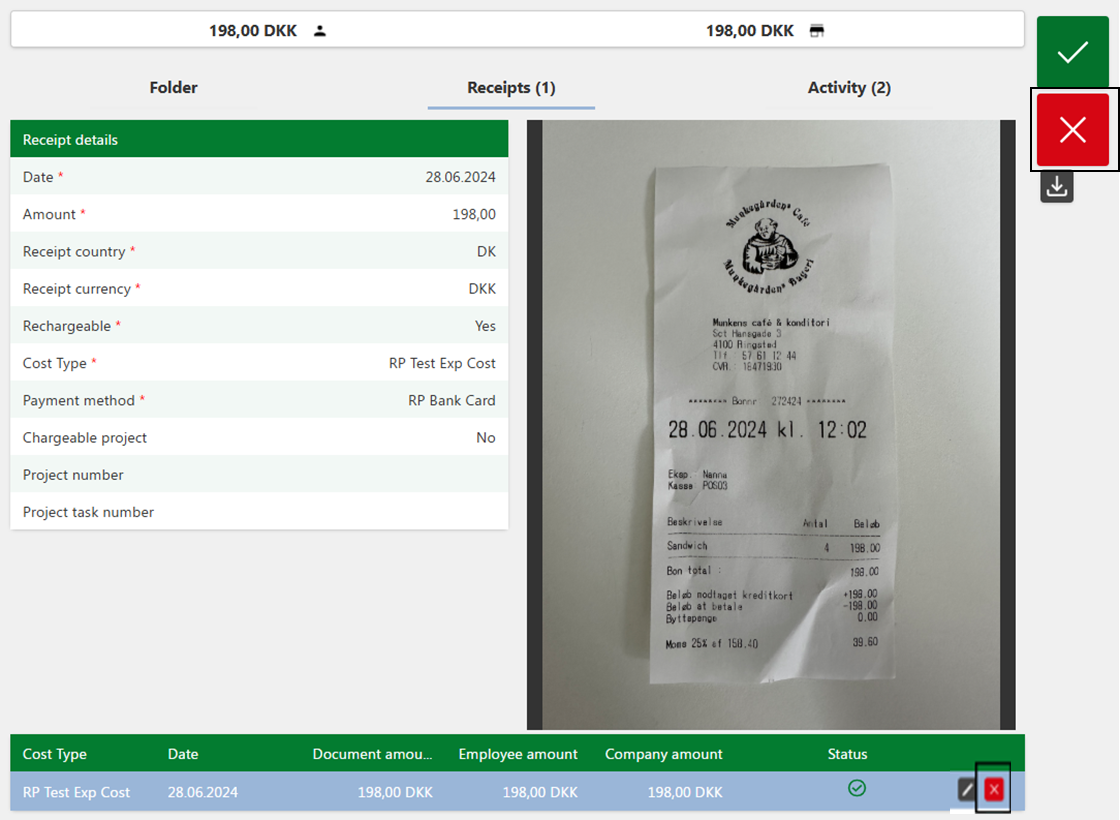
The accountant has the option of rejecting either the entire expense or a single receipt within expenses that consists of several receipts.

How to reject a single receipt
-
Naviger to the "Accountant"-tab.
-
Find the desired expense in the left table and click on the line beloning to it.
-
Click on the "Receipts"-tab to view all receipts included in the expense.
-
Find the desired receipt in the right table and click the red "X" (Reject)-button next to the receipt.
This feature makes it possible to deal with specific errors or deficiencies in individual receipts without affecting the other elements of the expense.
How to reject a complete expense
-
Navigate to the "Accountant"-tab.
-
Find the desired expense in the left table and click on the line belonging to it.
-
Click the red "X" (Reject)-button in the top right corner.
How to approve an expense
-
Naviger to the "Accountant"-tab.
-
Find the desired expense in the left table and click on the line belonging to it.
-
Click the green "Approve"-button in the top right corner.
Search field
There is a search field where you can enter one of the following parameters to find specific information:
-
Cost type
-
Date
-
Amount
In the search field there is a small "x" that you can use to clear the search field.
Filter buttons
There are two types of filtering of the "My Receipts"-table:
-
New
-
Rejected
When you open the page, the "New"-filter is automatically activated, which sorts the table with all receipts that are newly created. Activating a filter will make it appear with a slightly darker background.
The "Rejected" filter is a filter where expenses or receipts that have been rejected in the posting process are returned. These will require adjustments by the employee before they can be sent for approval again.
Table for receipts
The list of all receipts is displayed with the following parameters:
-
Checkbox
-
Cost types
-
Date
-
Amount
-
Status
When a receipt is uploaded, OCR (See more about OCR (LINK)) will read the date, amount, currency and fill in the fields in the receipt details. Next, you will have the opportunity to fill in the remaining fields yourself.
The checkbox is indicated based on the status symbol, so that you can select receipts and post them all at once.
Status is indicated based on the following two symbols:

Missing fields: This indicates that required fields need to be filled in, so that the individual receipt is ready to be posted. Therefore, the check box does not appear on the line.

Ready for posting:This indicates that the receipt is ready for posting. This will display the checkbox on the line.
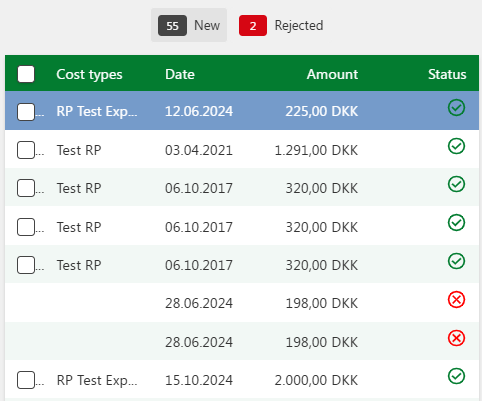
*Note that the expenses pictured above are fictive, and only created for documentation purposes. *
Navigation buttons and item display
Below the table you will find the following buttons, which allow you to customize the table as you wish:
-
Navigation buttons: The buttons on the left are used to navigate back and forth in the table.
-
Add/Create button: The button in the middle is for creating ("Add") receipt (expense).
-
Display buttons: The buttons on the right are used to select the display of the number of items in the table. The currently selected view is marked with a green color.
How to select a receipt:
-
Find the desired folder.
-
Click on the line belonging to the folder, so it changes color.
-
Press "Add to folder".
To cancel the process, press the Return-button.

How to edit the receipt details.
-
Select your receipt in the list of receipts.
-
Press the line for the receipt.
-
Press the Edit-button in the top right corner.
-
Edit the desired fields.
-
Press the Save-button in the top right corner.
If you regret editing the receipt, you can click the Return-button in the top right corner.

How to delete a complete receipt.
-
Select your receipt in the list of receipts.
-
Press the line of the receipt.
-
Click the red X (delete) button in the top right corner.
-
Confirm the deletion of the receipt by pressing the green button in the pop-up window that appears.
If you regret trying to delete the receipt, you can click the "Cancel"-button in the pop-up window.

Posting a receipt

How to post a receipt (if folders are turned on):
-
Press the New receipt button below the list on the left side.
-
Choose a file and upload to 2CA.
-
Confirm the receipt details.
-
Press the Edit button and add the missing information.
-
Press Save.
-
Press the green Post button.
-
Choose Create folder or Add to folder.
-
Hvis du vælger Add to folder:
-
Find a folder in the the list.
-
Select the folder by clicking on it.
-
Press Add to folder.
-
If the folder is new, click the edit button to fill in the fields at the folder level.
-
Press Save.
-
Press the My receipts tab and confirm the details.
-
Press the green Confirm button.
-
Go to My expenses.