Bank reconciliation
Bank reconciliation
Bank reconciliation is the process of comparing the transactions recorded in your bank account with the entries posted in 2Click Accounting to ensure that all records align accurately. The purpose is to confirm that the company’s financial records reflect the actual cash movements on the bank account.
In 2Click Accounting, bank reconciliation can be performed automatically through bank integrations or manually by uploading statements and payment files. The system makes it easy to identify discrepancies, match payments with invoices, and ensure that all transactions are correctly recorded and reconciled.
Access the bank clearing page by pressing the sum difference sign (

) in accounts, which will appear on accounts where the balance sheet does not match the sum of open transactions. This will open the following page:
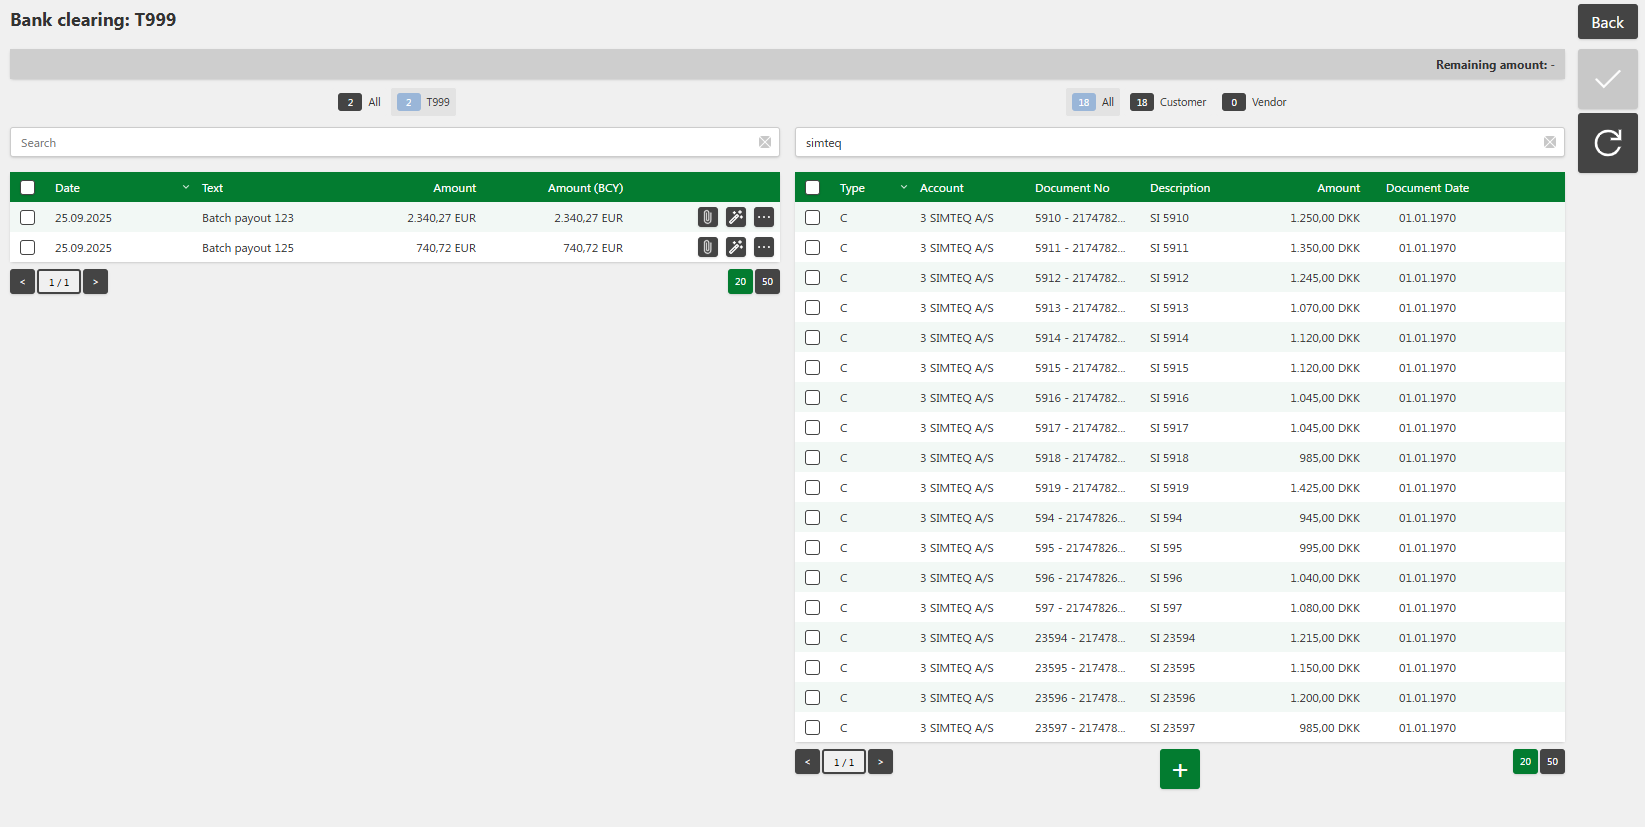
*Please note that the picture above is based on fictional input factors. The picture works as a "setup" example, where transactions to be reconciled are shown in the different rows. *
Bank reconciliation allows the user to perform a precise check and reconciliation between the current transactions in the bank account and the registered transactions in 2Click Accounting. This process is an essential part of financial management, as it ensures that the financial statements are consistent with actual bank transactions.

Automatic vs. Manual bank reconciliation
Alternatively, you can choose to use the Match statements button, which automates the process by matching the relevant bank transactions with the transactions recorded in the system. If you want to retain more control over the process, you can choose to perform the bank reconciliation manually. This requires you to use the "Reconcile transactions" button, which allows you to identify and address any discrepancies.
During the reconciliation process, it must ensured that the sum of the marked entries is zero, which means that the transactions and postings are balanced. A box at the top of the screen, called "Remaining Amounts," shows any discrepancies between the two tables and helps ensure that all amounts match.

Structure of Bank Reconciliation
The bank reconciliation is structured in two tables:
-
Left table: Shown here are all transactions for the relevant bank accounts that are either uploaded manually or automatically retrieved from the bank integrations.
-
Right table: Shown here are the posted transactions in 2Click Accounting, which are reconciled with the bank transactions.
Transaction Comments
There's also the option to add comments to each transaction through the "See More" button

. It is important to include comments when further explanation is needed, or when there are unusual transactions, errors, or missing documentation.
The comment field can also be used to upload the correct transaction text for recognition, helping the system trigger auto-matching more easily. Read more about this below in the “Auto-match entries” section.
Upload advice
The Upload advice button

allows you to automatically reconcile transactions based on uploaded payment advices.
A payment advice is a document (typically from your ERP, bank or payment system) that lists the individual invoices or entries included in a single bank transaction. You can also receive payment advices directly from your 2CA system. This function is useful when a single payment in the bank (shown in the left table) covers multiple open entries in 2Click Accounting (shown in the right table).
When a payment advice file is uploaded, the system reads all listed entries and automatically matches them to the corresponding open transactions in 2Click Accounting. Once the matching is complete, the system clears these entries and marks them as reconciled.
This ensures a fast and accurate reconciliation process - particularly for bulk payments where multiple invoices are paid together.

How to reconcile by uploading payment advice
Go to Bank → Accounts → Statements.
Select the relevant bank transaction on the left-hand side.
Click the Upload advice button.
Choose the payment advice file.
Click Upload to import the file into 2Click Accounting.
The system will automatically match all listed entries in the payment advice with the open postings on the right side of the reconciliation view.
Once the matching is complete, review the results.
If everything is correct, click Confirm in the top-right corner to finalize the reconciliation.

Receiving payment advices from 2CA
You can automatically receive payment advices from 2Click Accounting by defining a default email address under:
Bank → Settings (General) → Payment receipts.
When a payment advice is automatically sent to this address through 2CA, you can save the file to your device it can be uploaded for reconciliation via the Upload advice button.
Auto-match entries
The Match entries button

automatically matches open entries on the right-hand side of the reconciliation view with the selected bank transaction on the left.
The system analyses key identifiers such as document numbers, payment references, amounts, and dates to determine which open entries belong to the selected transaction.
When a complete match is found, the system reconciles those entries automatically and marks them as cleared.
This ensures fast and accurate reconciliation without the need for manual matching - particularly useful when all details perfectly align between the imported bank transaction and the accounting records.
With the newest release (November 2025), the automatic matching logic has been significantly improved, offering more precise matching - including support for FIK codes and invoice numbers with prefixes. We continue to refine this functionality to further reduce manual work and improve reconciliation efficiency.
How to use Match entries
Go to Bank → Accounts and open the desired bank reconciliation view.
In the left table, select the bank transaction you wish to reconcile.
Click the Match entries button .
The system will automatically search for open entries on the right-hand side that fully match the transaction (based on ID, amount, and date).
If a full match is found, the entries will be automatically reconciled and marked as cleared.
Review the result - if all amounts balance and the “Remaining Amount” shows 0, click Confirm to finalize the reconciliation.
Tip: Use comments to trigger auto-match
In some cases, the Match entries button does not appear because the system cannot correctly interpret the invoice numbers from the bank’s transaction text and match them with the open entries. This usually happens because the bank message contains irregular or corrupted invoice numbers — for example:
a digit has shifted into the wrong place
invoice numbers have been partially merged
a single wrong character breaks the expected pattern
When this occurs, you can manually correct the invoice numbers from the transaction text and paste them into the Comment field to help the system recognise them.
How to trigger auto-match:
Open the transaction using See more.
Copy the relevant invoice numbers from the transaction text.
Paste them into the Comment field and rewrite them in the correct, readable format.
Save the transaction.
Example
The bank text contains a corrupted string like:
INV100 1 INV100 3INV1004
(where it's supposed to be INV1001 INV1003 INV1004, but the digits have jumped in the retrieving process from your bank).
The system cannot identify INV100 1 INV100 3INV1004from the open entries, so the auto-match button does not appear.
Correcting the comment to:
INV1001, INV1003, INV1004 or INV1001 INV1003 INV1004
and saving allows the system to recognise the numbers again.
The Match entries button will appear, and clicking it will automatically reconcile all matching open entries.

Resolution of differences between purchase date and posting date
To accommodate scenarios where there may be a difference between the date of purchase of a product or service and the date when it is actually posted, we have developed a solution. We have added a "+" (Add) button under the right table, which allows you to add an entry to your existing transactions. This allows you to match a transaction with the selected posting and correct any discrepancies.
How to add a posting:
-
Click the "+" button below the right table.
-
Select the desired account type (G/L account, customer, vendor).
-
Select the specific account.
-
Select the desired currency.
-
Enter the amount (the amount in your company's currency will be automatically calculated in the next field).
-
Enter a description for the transaction.
-
Add a file attachment to specify the entry.
If you wish to undo, you can click on the "Cancel" button.
When you have added the transaction in question to the transaction table, you will receive a confirmation on the screen. From this confirmation, you can choose to adjust or delete the added transaction as needed.
Once the transactions and transactions have been matched, the "Confirm" button will be activated in the top right corner of the screen. This button becomes visible when the system has automatically matched the transactions with the postings.
Filters and search
In the left table, you have the option to easily manage the filtering of accounts, which is especially useful when multiple accounts are linked. Alternatively, you can choose to show all accounts in a consolidated list. The system offers an easy-to-use filtering feature that allows transactions to be sorted by specific criteria. When you activate a filter by clicking on the appropriate filter button, this will be visually indicated by the button taking on a marked background color.
Filtering in the left table: You can filter using the following parameters:
- Text
Filtering in the right table: In the right table, you can filter between transactions from customers or vendors. In addition, the system offers the possibility of searching based on the following parameters:
-
Account
-
Document number
-
Description