Settings
The settings for Expenses constitute the overall configuration options that the administrator sets at company level. Some tabs are only displayed if the corresponding functionality is activated.
Standard tabs
By default, the following tabs are displayed:
-
General
-
User setup
-
Cost types

Tabs that require enabled functionality
The following tabs are only displayed if the relevant functionality is enabled:
-
Dimension setup
-
Mobile settings
-
Cross company approval
-
Credit card
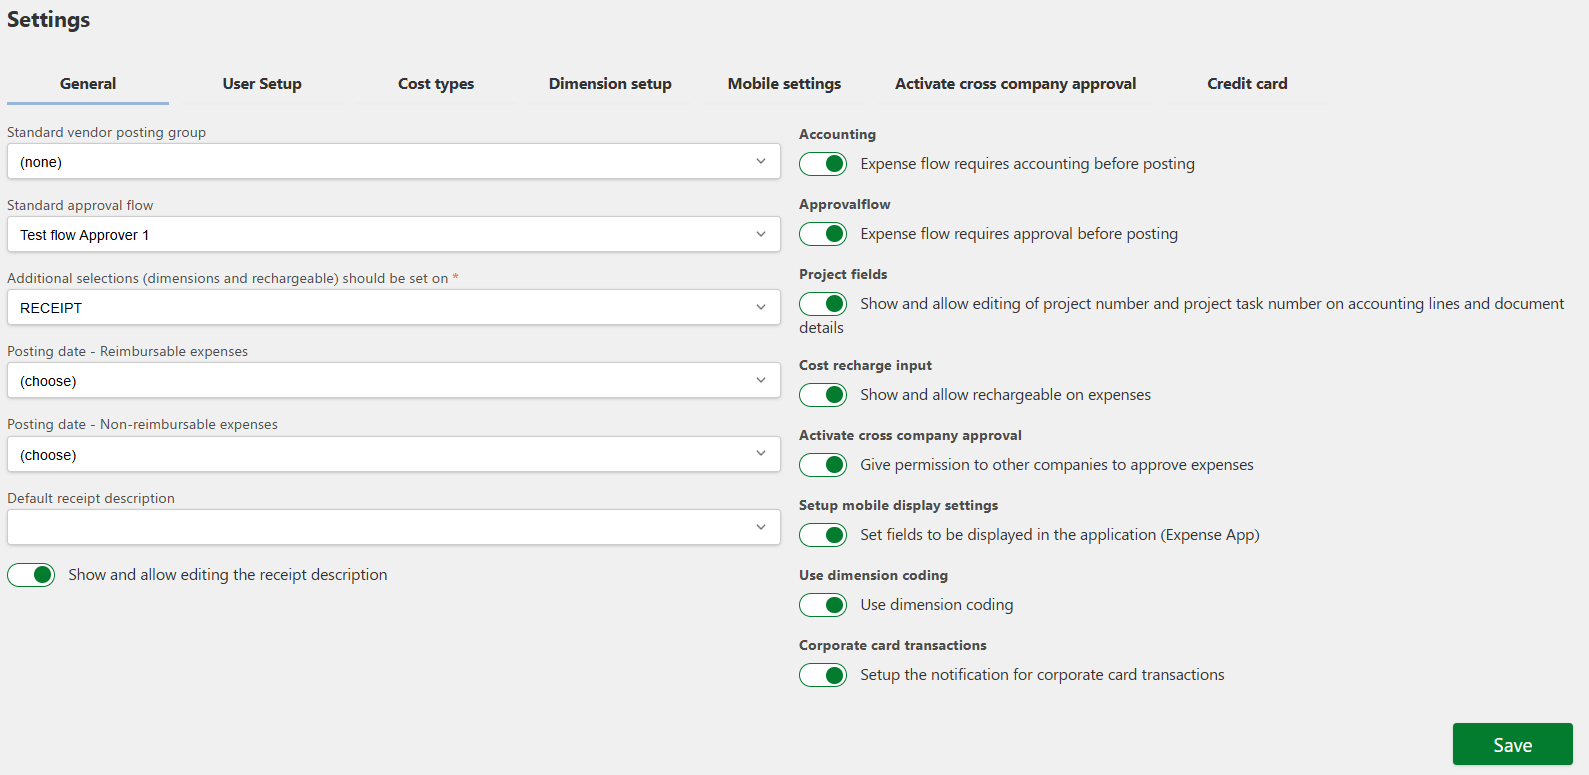
General settings
The general settings allow users to configure additional functions and adapt the system to the company's needs. For example, if the "Use dimension coding"-feature is enabled, a dedicated tab becomes available where dimensions can be defined based on information retrieved from your accounting system.
These settings consist of the following, which are detailed below:
- Standard vendor posting group
Specify a standard vendor posting group that is used automatically unless another is selected during posting. This simplifies the process by automatically assigning default accounts, reducing the risk of errors and ensuring consistency in accounting.
Standard approval flow
Streamlines the approval process by ensuring all expenses follow a predefined flow, reducing unnecessary delays and ensuring compliance.
Additional selections: Folder or Receipt
Enables flexibility in the level of detail for accounting, so that processes can be adapted to the company's needs and complexity.
Posting date - Reimbursable expenses
Choose between the processing date or the document date as the posting date used. Provides precision in reporting by allowing selection of the most relevant date for proper periodisation and reconciliation.
Posting date - Non-reimbursable expenses
Choose from processing date, document date or transaction date as the posting date used. Provides precision in reporting by allowing selection of the most relevant date for proper periodisation and reconciliation.
Default receipt description
Automates the filling in of descriptions, which saves time and ensures consistency in the documentation.
Show and allow editing the receipt description
Ensures flexibility by allowing users to adapt standard descriptions when special conditions require it.
These features help reduce manual errors, improve data structure, and ensure proper financial management and reporting.
Options and Functionality
Accounting
If the company wants extra control in the accounting process, the "Accounting"-function can be activated. This ensures that a bookkeeper can review and validate expenses and receipts to ensure proper accountign and compliance with company policies and guidelines.
By activating this function, the "Accounting"-tab will become available in the system. This tab gives the accountant the following options:
-
Review all submitted expenses and receipts.
-
Make necessary adjustments or corrections to expense- and receipt details.
-
Ensure that data is correct and completely filled in before the expense is sent further in the approval flow.
Approval flow
The approval flow is an essential feature that must be enabled to ensure that the value from the Standard approval flow-field is used in the posting process for expenses and receipts.
When the function is activated, the selected approval flow – defined under Standard approval flow – will handle all control- and approval processes. This ensures that all expenses and receipts go through a structured and systematic check before they are finally posted.
Project fields
Project fields is a feature that allows the employee to record financial transactions, accounting lines or document details under a specific project number and project task number.
This function ensures that costs and expenses can be easily linked to relevant projects and tasks. This is particularly important in companies where project-specific reporting and cost management play a central role, such as in the consulting industry, the construction sector or research projects.
When project fields is activated in the system, the employee will have access to fields where the project number and project task number can be registered. This information follows the transaction throughout the accounting process, enabling accurate tracking and reporting of expenses on a project-by-project basis.
Project number and Project task number are both terms that are often used in the context of project management and work assignments:
-
Project number: This is a unique number or identifier assigned to a specific case or project. It is used to identify and organize information and documentation related to the case in question.
-
Project task number: This refers to a specific number assigned to a subtask within a larger case or project. It is usually used to identify and separate different tasks to be performed during the course of the project.
Cost recharge input
The Cost recharge input setting is used to mark expenses and costs that must be forwarded to a customer or another party. The function is particularly relevant in companies where expenses are incurred in connection with customer-specific projects or tasks, and where these expenses must subsequently be reimbursed by the customer.
When the function is activated:
-
The cost recharge input field becomes available in the user interface when creating and editing expenses and receipts.
-
The employee or accountant can mark specific expenses as billable through the field.
-
These marked expenses can then be easily included in the invoicing process and reported to relevant customers.
Activate cross company approval flow
This function makes it possible to approve expenses and receipts across several companies registered in 2Click Accounting. It is particularly useful for organizations with multiple legal entities that want a centralized process for controlling and approving expenses.
When the function is activated:
-
A new tab is added in the expense settings where specific approval flows and rules for cross company approval can be configured.
-
Employees and approvers can manage expenses and receipts across the affiliated companies without having to switch between different systems.
-
Connect data across the financial systems of the individual companies, which enables uniform accounting and reporting.
Setup mobile display settings
When the Mobile Screen Settings feature is enabled, a new tab is added under Settings. This tab allows administrators to configure which fields should be displayed on the employee's mobile screen when uploading a receipt via the Expense application. This feature is designed to improve ease of use and ensure that the necessary information is entered correctly while the employee is working on their smartphone.
When the function is activated:
-
The administrator can select and configure the relevant fields for the mobile screen display.
-
When the employee uploads a receipt, they will see the defined fields, and can quickly finish the upload process, after which the system can capture the receipt for further processing.
-
The accountant can also decide when the processing button becomes active, giving additional control over the flow of the expense processing.
Use dimension coding
Activating the Dimensions function enables an advanced accounting organization of expenses and receipts. When the feature is activated, a new tab called "Dimension Setup" is added under "Settings" where dimensions can be configured and structured according to the needs of the business. Dimensions are used to categorize and record transactions correctly in the company's accounting, making it easier to meet audit requirements and generate accurate financial reports.
-
When the function is activated, the dimensions must be set up in the Dimension Setup.
-
After this, the defined dimensions will be available throughout Expenses, and employees will be able to select the relevant dimensions when creating expenses or receipts.
-
The order of the dimensions and requirements for completion can be controlled to ensure a correct and consistent accounting process.
Places where dimensions can be set in the system:
Cost types
-
Dimensions can be linked to specific cost types. When an employee selects a particular cost type, the associated dimensions are automatically displayed based on the setup. This ensures that relevant dimensions are used consistently.
User setup
-
Under User Setup, dimensions can be set as forced for a single user. This means that the user must fill in certain dimensions before expenses or receipts can be registered or posted.
My receipts
-
When filling in receipt details in My Receipts, relevant dimensions can be added or selected. This allows receipts to be assigned to the correct accounting categories.
Ved godkendelse på tværs af virksomheder
- If the Cross company approval-function is enabled, dimensions can be used to ensure that expenses and receipts are correctly distributed between the different companies in the approval process.
Note: Changes in dimensions will affect the dimension values everywhere in Expenses.
Corporate card transactions
When this option is enabled, the Credit card settings tab becomes available.
This feature allows your organization to configure notifications related to corporate card transactions. Once activated, you can define an email address under the Credit card tab to receive alerts whenever new corporate card transactions are imported into the system.
Enable Mileage/Diems
This setting controls whether your company can configure and use mileage reimbursements and per-diem allowances in 2Click Accounting.
When enabled, a new Mileage/Diems tab becomes available in the Expenses settings. From there, administrators can activate and define rules for employees to submit:
Mileage expenses (e.g., reimbursement for kilometres driven for business purposes)
Per-diem expenses (e.g., daily allowances for business travel)
This allows the company to manage travel-related expense policies directly within the system before employees begin submitting these expense types.
User setup
The User Setup presents a table of all active users registered to use 2Click Accounting. Only accountants or administrators have access to make adjustments on behalf of employees, ensuring control and accuracy in setup. The list is organized alphabetically by the users' names, making it easy to navigate and find specific users.
It is important to note that users only become available in this list once they are created inUsers found in theSettings.
The location of User Setup
The User setup function is integrated as a tab in Expenses to enable direct adaptations of the individual employee's settings, whereas the table below shows the list of all users. This makes it possible to configure the user's setup on an ongoing basis, depending on the company's needs or the employee's specific requirements.
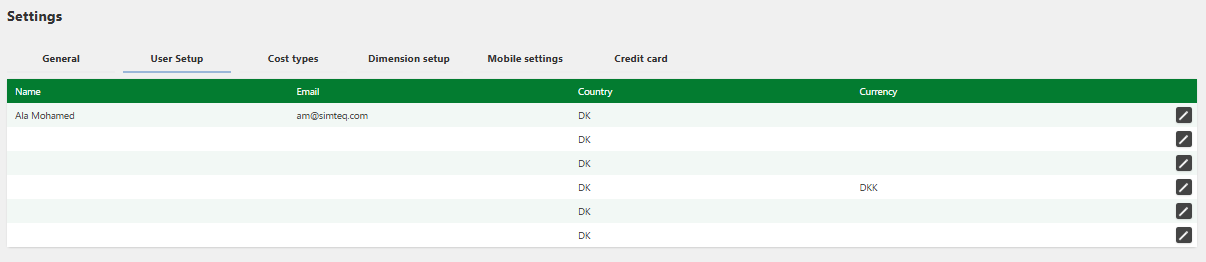

How does the accountant change the user setup for another employee
Click on Expenses, then select Settings.
-
Click the User Setup tab to access the list of employees.
-
Find the desired employee in the table and click the edit button on the right.
-
Edit the user information, including payment methods for the employee in question.
-
Click Save to ensure the new settings are saved.
Editing a user setup
Setting up user setup is identical to the User Setup-page, where the user can create his own user setup. While editing user setup, there are two tabs:
-
User details
-
Payment methods
User details
User setup is the configuration used to handle posting of expenses and receipts. Certain information is automatically obtained from the user profile, such as email and name, and an email address is automatically generated for posting. This email address can be used by the user to send their expenses or receipts, after which they are submitted to My receipts. Corresponding purchase invoices have a specific email address they are sent to; this works the same way, however this email address is only accessible to the user himself.
Email and name can only be corrected in Users in the Settings module.
Functions
-
Secretary functions
-
Vendor account
-
Vendor posting group
-
Approval flow
-
Set default dimensions (Button)Secretary function
The secretary function allows another employee to be assigned rights to create and post expenses and receipts on behalf of a user. In the following example, Ala Mohamed has selected SIMTEQ ADM as his secretary, which authorizes SIMTEQ ADM to act on behalf of Ala Mohamed. In order for SIMTEQ ADM to do so, SIMTEQ ADM must select Ala Mohamed from the drop down list below where it says "Act on behalf of user".
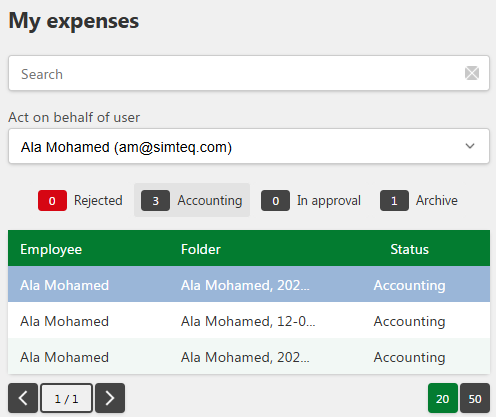
Set default dimensions
Dimensions on the user profile can only be configured if the Dimensions function is activated under the General tab in the Settings for Expenses.
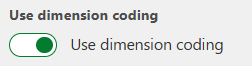
**How to set default dimensions in user setup:
Click on Expenses, then select Settings.
-
Click the User Setup tab to access the list of employee.
-
Find the desired employee in the table and click the edit button on the right.
Scroll down and click the Set Default Dimension button.
Select the desired values in the dimension fields.
- Click Save to ensure the new settings are saved.
If you regret the setup, you can click the Cancel button to abort the process without saving.
Vendor account
By setting up a vendor account on a user, you can link a specific account to the employee, which is particularly relevant in connection with company card setup. This function ensures that transactions from the company card are correctly linked to the relevant supplier account, which simplifies the accounting process and provides a clear overview of expenses associated with the individual card. This is especially useful when multiple company cards are managed in the same company.
To be able to use a vendor account, the account must first be created in the *Vendor setup in the Purchase invoices section. *
Approval flow
Setting up a specific approval flow for a single user allows the approval process to be adapted if there are special needs for the employee in question. This option ensures that the user follows a unique approval flow, which may differ from the company's general setup. The function is ideal in cases where certain employees, such as managers or project managers, need specially adapted control and approval steps for their expenses.
In order to use a specific approval flow, the approval flow must first be created in the *Approval Setup in the Settings section. *
Reset dimension values for a user profile
Click on Expenses, then select Settings.
-
Click the User Setup tab to access the list of employee.
-
Find the desired employee in the table and click the edit button on the right.
Scroll down and click the Set Default Dimension button.
Click the X (delete)-button for the dimension you wish to clear.
- Click Save to ensure the new settings are saved.
If you regret the setup, you can click the Cancel button to abort the process without saving.
How to complete a user setup
Click on Expenses, then select Settings.
-
Click the User Setup tab to access the list of employee.
-
Find the desired employee in the table and click the edit button on the right.
-
Fill in all required fields. Please note that the required fields must be completed as a minimum.
-
Click Save to ensure the new settings are saved.
If you regret the setup, you can click the Cancel button to abort the process without saving.
Payment methods
Payment methods can be configured individually for each employee to reflect different scenarios depending on the specific situation. This gives the opportunity to adapt the system to the employee's needs, for example by using a private card or a company card for expenses. An effective payment method setup ensures correct accounting and reconciliation, which is essential for proper financial management.
The specific payment methods that can be set up include the following:
Payment methode: This can be defined as either a private card or a company card. The choice here affects how the expense is handled financially, as private cards typically require reimbursement, while company cards can be linked directly to the company's accounting system.
Reimbursable to user: If this function is activated, the expense will be reimbursed to the employee's private card. When the expense is posted, the system will generate a payment to the employee, which is then reconciled with the bank account. This creates a payment flow where money moves from the company to the employee.
Vendor account: If "Refund to user" is not activated, a company card can be used. In this case, it is possible to link a supplier account to the expense, which makes it possible to keep accounts of company card expenses and reconcile them correctly in the bank.
Default payment method: This function enables one payment type to be set as the default for posting expenses. When Default payment method is activated for a specific payment type, this will automatically be selected when posting future receipts. This makes the process more efficient and reduces the risk of errors.
How to create a payment method
Click on Expenses, then select Settings.
-
Click the User Setup tab to access the list of employee.
-
Find the desired employee in the table and click the edit button on the right.
-
Select the Payment methods tab.
-
Click + (add) to create a new payment method.
-
Write the desired payment method in the** Payment method ** field.
-
Select the checkbox for whether the payment should be reimbursable to the user.
-
Select the desired vendor account.
-
Click Save to ensure the new settings are saved.
If you regret the setup, you can click the Cancel button to abort the process without saving.
How to edit a payment method
Click on Expenses, then select Settings.
-
Click the User Setup tab to access the list of employee.
-
Find the desired employee in the table and click the edit button on the right.
-
Select the Payment methods tab.
-
Find the desired payment method and press the edit button.
-
Edit the desired fields.
-
Click Save to ensure the new settings are saved.
If you regret the setup, you can click the Cancel button to abort the process without saving.
How to delete a payment method
Click on Expenses, then select Settings.
-
Click the User Setup tab to access the list of employee.
-
Find the desired employee in the table and click the edit button on the right.
-
Select the Payment methods tab.
-
Find the desired payment method and press the delete button.
-
Confirm the deletion by clicking the confirmation button in the pop-up window.
Do stop the deletion of the payment method, you can click the Cancel button.
Cost types
Cost types are a central function of the accounting process as they help categorize and manage the company's expenses in a systematic way. When cost types are properly created and configured, they become an important tool for ensuring proper accounting and reporting of expenses. The specific fields that can be filled in make it possible to adapt and optimize how costs are handled in the accounts.
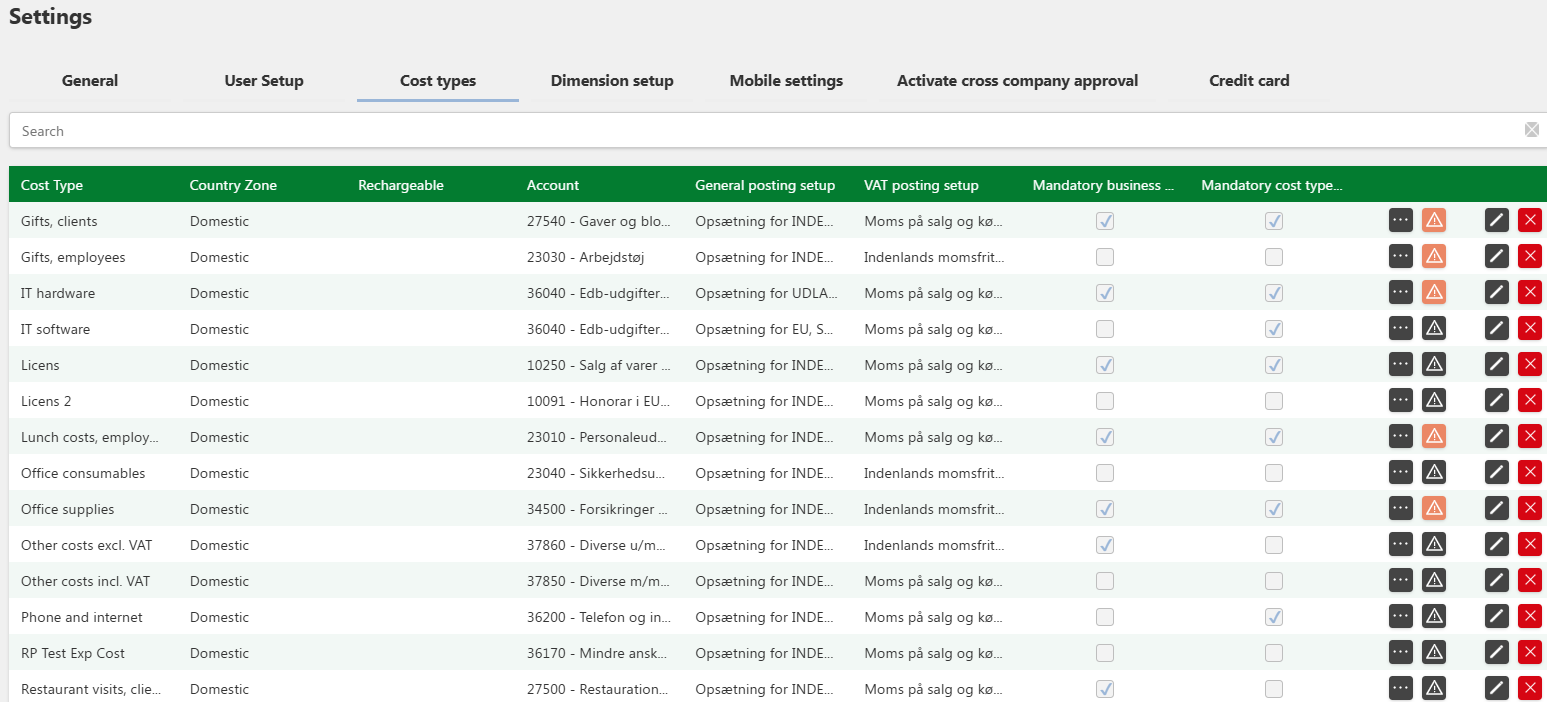
For each cost type registered, you can define the following:
Cost type
Defines the specific category of costs to which the expense belongs, e.g. travel costs, materials or IT software.
Country zone
Used to indicate geographic regions, which may be relevant for VAT processing and reporting of expenses in different countries or tax areas.
Rechargeable
This setting indicates whether the cost can be passed on to a customer (for example, in the case of project-based expenses) and thereby makes it possible to invoice the customer for these costs.
G/L-account (General Ledger-account)
Specifies the account to which the cost should be posted to accounting wise.
General posting setup
Defines the specific method used to record the cost, which may include different accounting principles and procedures.
VAT posting setup
Allows you to configure how VAT should be treated for the specific costs, which is essential for correct VAT reporting and reconciliation.
Mandatory business purpose comment
A field that can be added and made mandatory below the receipt details that allows comments related to the overall business objective of the cost to be added.
Mandatory cost type comment
A mandatory comment field that allows specifying any additional information or specifications for the cost, ensuring a higher degree of transparency and understanding in the accounting.
Dimensions
If the business uses dimensions to track costs across projects, departments, or other relevant factors, dimensions can be assigned to the cost type. This makes it possible to adjust and split expenses across different categories and ensure accurate analysis and reporting.
Special flow
In relation with the posting and approval processes, you can implement a special flow that makes it mandatory to fill in certain fields in the receipt details. This special flow can be adapted to meet specific business needs, ensure correct accounting and optimize the administrative process.
When a special flow is activated, employees will be asked to complete certain fields, which may include:
Flow Type
Specifies the type of flow to use. This helps define how the process should be handled and what logic should be followed. This can either be set to "Comment field" or "Amount field", depending on the context of the associated question to the expenses containing the selected cost type.
Question (Yes/No)
A simple yes/no question that can be used to gather important information about the expense. For example, it may be necessary to ask: "Is this a customer meeting?". This question helps to categorize the cost correctly and can affect the following steps in the accounting process.
Example: A specific question that asks if the expense relates to a customer meeting. If the answer is "Yes", it may trigger an alternative accounting procedure, as customer meetings may have special requirements for both VAT processing and accounting processing.
Select the option that triggers alternative coding
The user selects an option that triggers an alternative posting code. This may be relevant in cases where different types of expenses require specific account and VAT processing.
Alternative coding leading text
A text indicating the alternative accounting method to be used when a particular choice has been made, such as "Specify the participants". This may be necessary to adjust the accounting so that it is consistent with the company's rules and procedures.
Alternative G/L account
If an alternative general ledger system (G/L) is to be used, it can be defined here. This ensures that the cost is posted correctly according to the company's specific accounting policy.
Alternative VAT posting group
Indicates which VAT posting group that is to be used, such as "DOMESTIC PRODUCT - VAT on the sale and purchase of domestic products". This is necessary to ensure correct VAT processing and reconciliation.
Alternative general posting setup
Defines an alternative setup of general posting if there is a need to adjust the posting for certain expenses. This makes it possible to maintain flexibility in accounting and ensure that expenses are treated in accordance with specific requirements.
Overview of Cost Type buttons

See More: This button allows you to define and configure dimension setup for the selected cost type.


Special flow (disabled): Used to configure a specific flow type that the employee must follow when posting expenses or receipts for the cost type in question. By default, the button is black when the setup is not active, and turns orange when the setup is done and active.

Edit: Used to edit and update the cost type.

Delete: Used to delete the selected cost type from the setup.
How to create a cost type
-
Click on Settings under Expenses.
-
Go to to the tab Cost types.
-
Scroll down to the bottom of the table and click the + (Add) button.
-
Fill in the required fields.
-
Click Save to save the created cost type.
If you regret during creation, you can click the Cancel button to cancel.

How to edit a cost type
-
Click on Settings under Expenses.
-
Go to to the tab Cost types.
-
Find the desired cost type in the list.
-
Press the Edit button.
-
Edit the desired fields.
-
Click Save to save the changes done to the cost type.
If you regret changes made, you can click the Cancel button without saving.

How to delete a cost type
-
Click on Settings under Expenses.
-
Go to to the tab Cost types.
-
Find the desired cost type in the list.
-
Press the X (Delete)-button.
-
Confirm the deletion by pressing the green Confirm button.
To cancel the deletion, press the red X (cancel)-button that appears when asked to confirm the deletion.

How to create special flow for a cost type
-
Click on Settings under Expenses.
-
Go to to the tab Cost types.
-
Find the desired cost type in the list.
-
Click on the button with the triangular symbol ("Special flow").
-
Create the desired special flow, filling in the mandatory fields (*) as a minimum.
-
Click Save to complete the creation of the special flow.
If you regret changes made, you can click the Cancel button without saving.

How to create dimensions for a cost type
Before setting up dimensions for a cost type, you must enable Use dimension coding under the General settings for Expenses.
-
Click on Settings under Expenses.
-
Go to to the tab Cost types.
-
Find the desired cost type in the list.
Click the button with the three dots (See more).
Create the desired dimension for the cost type.
- Click Save to complete the creation of the special flow.
If you regret changes made, you can click the Cancel button without saving.
Dimension setup
Dimension setup is used to categorize and assign specific accounting information to expenses and receipts, which is essential for proper accounting and reporting in the financial system. By defining dimensions in a specific order, you can ensure that costs and revenues are distributed correctly to the relevant accounts and projects.
When you post receipts and expenses, you can choose the dimensions to use for each transaction, allowing you to track expenses across different business areas, departments or projects. This enables the company to obtain more accurate and detailed financial reports that reflect the company's activities and decision-making.
Examples of dimensions may be:
-
Department: Used to track expenses and income specifically for different departments within a company (eg sales, marketing, HR).
-
Project: Helps keep track of costs and revenues for individual projects or tasks.
-
Client: Enables analysis of income and expenses related to specific customers.
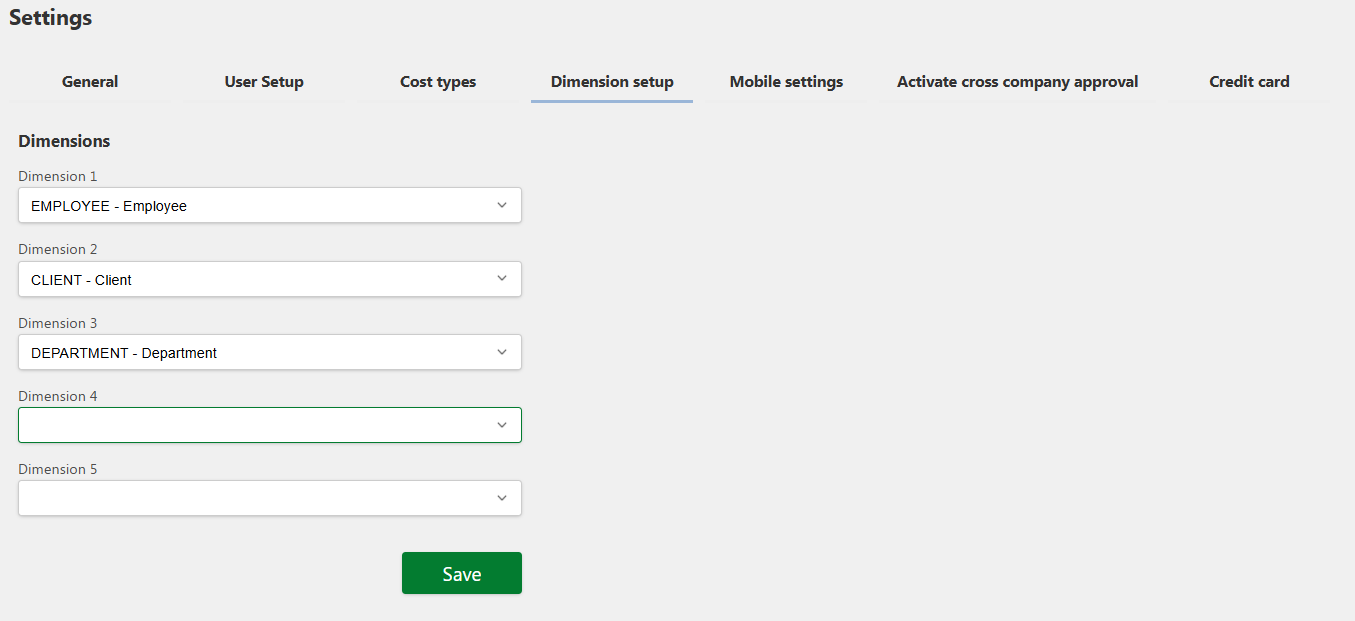
How to create dimensions
To set up dimensions, follow these steps:
-
Click on Settings under Expenses.
-
Enable Use dimension coding.
-
Press Save
-
Go to the Dimension setup tab.
-
Select the desired amount of dimensions in the fields.
-
Press Save.
Mobile settings
Under the mobile screen settings, you can configure which fields should be displayed when employees post expenses or receipts.
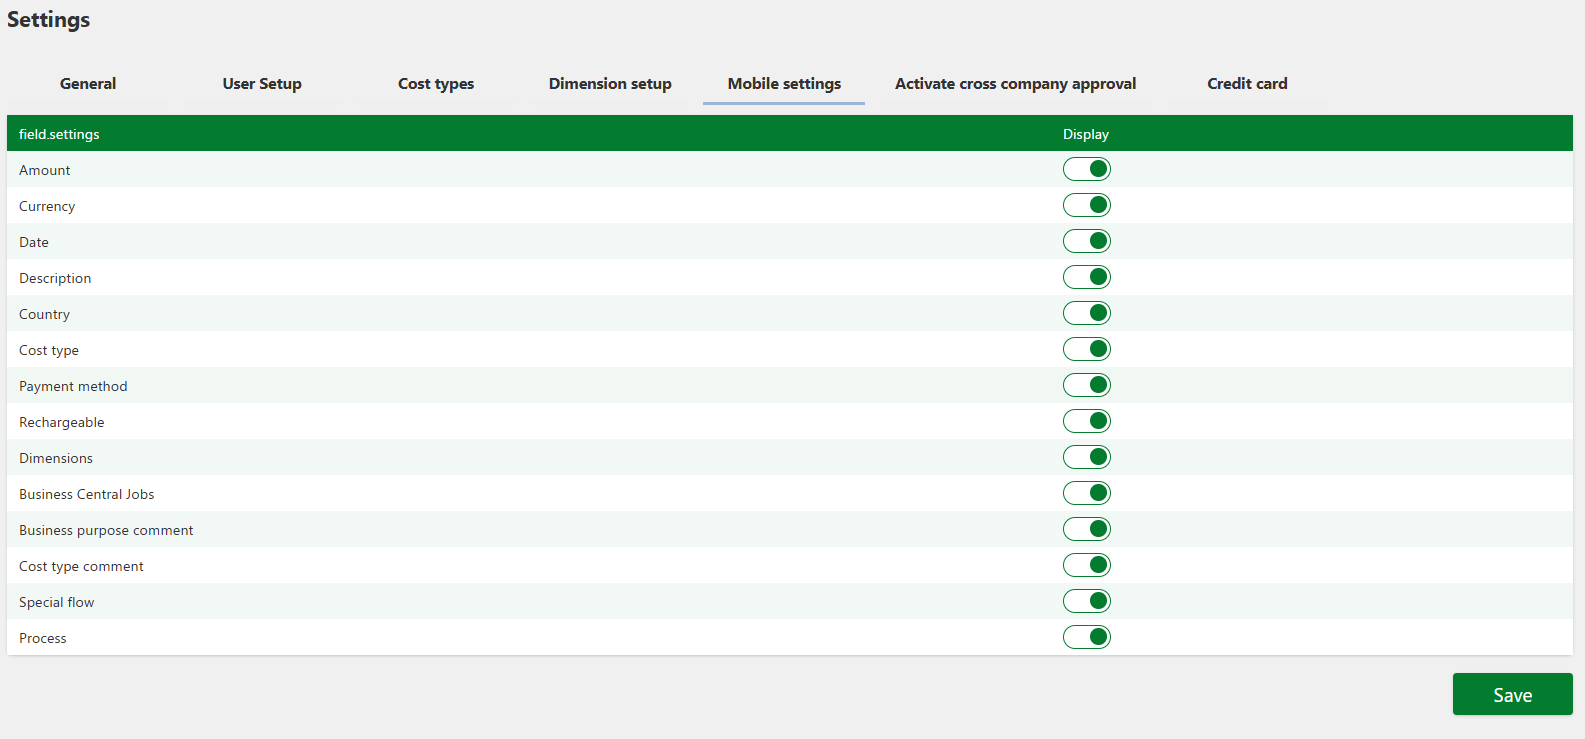

How to select a field to display in mobile view
-
Click on Settings under Expenses.
-
Enable Setup mobile display settings.
-
Press Save.
-
Go to the Mobile settings tab
-
Find the desired field.
-
Activate the field in the Display column if it should be visible to the employee when the receipt details are to be filled in.
-
Press Save.
Cross company approval
To display the "Activate cross company approval"-tab, the feature must be enabled under the "General Settings" tab. Approve across the company is an advanced approval flow that can be used across companies. Contact support for further information.
Cross company approval allows you to approve expenses and receipts across different units in the organization, which can be particularly useful in companies with multiple departments or subsidiaries. This function ensures that expenses originating from one company can be approved by an approval flow in another company, while maintaining the necessary control and reconciliation.
Cross company approval is defined by the following fields:
-
Dimensions: The dimensions created in dimension setup, play a central role in ensuring that expenses are correctly classified and distributed across companies.
-
Rechargeable: The option to choose whether the expense should be rechargeable to another unit. This can either be specified as blank (not rechargeable), yes (rechargeable active) or no (not rechargeable).
-
Tenant company: The company responsible for approving the expenses. This allows choosing an approval authority in another company if necessary.
-
Approval flow: Which approval flow should be used in the selected company. This flow determines how the expense must be approved and which steps must be followed before it is approved and posted.
This setup enables companies with multiple legal entities to standardize and streamline the approval process across the organization, ensuring proper control and compliance with internal rules and procedures.

How to set up cross company approval
-
Click on Settings under Expenses.
-
Enable Activate cross company approval.
-
Press Save.
-
Go to the Activate cross company approval tab.
-
Press the + (Add)-button.
-
Fill in the fields and create your cross company approval setup for a selected user.
-
Press Save.
Credit card
Setting up email receiver for credit card reconciliations
Under Credit card settings, you can configure an email address to receive automatic reconciliation reports. These reports are generated when corporate card transactions are matched and reconciled with the associated receipts after they have been authorized.
This feature is designed to provide better visibility and control over the voting process by ensuring that relevant parties, such as the finance department or the accountant, receive updates on the status of votes directly to their inbox.



How to set up credit card notification email
-
Click on Settings under Expenses.
-
Enable Corporate card transactions.
-
Press Save.
-
Go to the Credit card tab.
-
Write the email of the desired person to receive notifications in the field (e.g. an accountant)
-
Press Save to save the changes.

Mileage/Diems

Enabling mileage and per-diem submissions in Expenses
In the Mileage/Diems settings, you can enable employees to submit mileage reimbursements and per-diem (daily allowance) expenses. These functions allow users to register travel-related costs without attaching a receipt, based on predefined cost types. When the feature is enabled, users will have access to mileage and/or per-diem entry options in the Expenses module, ensuring that travel expenses are tracked accurately and consistently across the organization.
You can also select which cost type with values retrieved from your ERP system to be used for these postings, ensuring that mileage and per-diem transactions are booked to the correct accounts automatically.
How to enable Mileage and Diems
Go to Expenses → Settings.
Enable Mileage/diems by toggling the switch.
Click Save.
Once enabled, a Mileage/diems tab will appear.
In the Mileage section, toggle to allow submitting mileage expenses and select the appropriate cost type.
In the Diems section, toggle to allow submitting per-diem expenses and select the appropriate cost type.
Press Save to apply the settings.